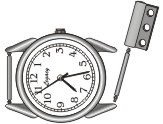
Stringing a Watch with a Toggle Clasp — #68-002-09
Suggested Parts: |
||
| 1 | 58-011 | Watch Head |
| 1 pr. | 58-314 |
3-Hole pewter tip (or 58-540 Sterling Butterfly tips) |
| 1 | 39-154 |
Toggle Clasp, Pewter (or 39-558, Sterling) |
| 1 pr. | 43-601 |
Plated Bullet Ends (or #43-505, sterling) |
| 0.015" diameter Beadalon® | (wire cable for stringing) | |
| 6 | 41-258 | Small Crimp Beads |
| 2 | 41-259 | Large Crimp Beads |
| 2 | 37-722-1 | 2" Eye Pins (or #37-815 1.5" sterling eye pins) |
At least 16" worth of beads (if they were strung in a straight line). 15-16" of beads make a 7 inch, 3 strand watch. A few 2mm and/or 3mm round beads are helpful at the ends, to fit into, or snugly up against, the bullet ends.
Tools:
You will need a pair of cutters, and a pair of round needle nose pliers. A watch pin tool is also helpful, but other tools may be used in its place. Crimping pliers are handy when crimping crimp beads, but since the crimp beads in this project are not visible when the jewelry is worn, it's ok if your crimp beads aren't flattened beautifully, as long as they hold tightly. (What I'm saying is, the needle nose pliers will be fine for crimping, especially in this project.)
Instructions:
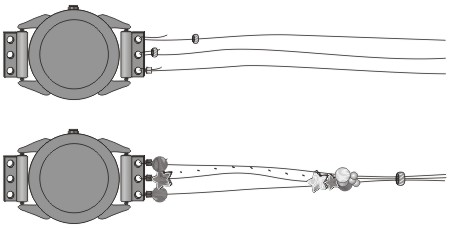
- Attach watch tip to watch head.
- Remove pin from watch. A watch pin tool (#65-008), needlenose pliers, or a tiny screwdriver may be used. Beware: when the spring tension is released, watch pins like to FLY!... usually to the least convenient hiding place.
- Slip the pin into the tube of a watch tip, and insert the pin back into the watch head.
- String Beads on one side of band:
- Cut 3 long pieces of Beadalon. 6" is usually plenty for each piece.
- Use one small crimp bead per piece of cord. Attach each piece of cord to its own hole in the back of a watch tip. Gently, but firmly, crimp each crimp bead.
- String beads in any pattern, on all 3 strands. Measure as you go to fit wrist size. (Don't forget to include length of clasp when measuring.)
Standard bracelet lengths are 7 to 8 inches. - Slide all 3 pieces of cord through a large crimp bead, then through the eye of an eye pin, and back through the crimp bead...
- Now string the bullet end back onto the eye pin.
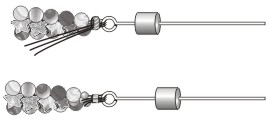
- Finish end, and attach clasp:
- Use round needle nose pliers to make a loop in the eye pin, leaving enough room between the loop and bullet end to fit about 3 coils.
** Note: If using split rings (or no extra rings) to attach your clasp, slide your clasp on now, before you start wrapping the end. ** - Using pliers, start coiling the wire (the end of the eye pin), beginning at the loop. When it looks like you only have room for one more coil, trim the excess wire, keeping just enough to make your final coil. Finish the final coil.
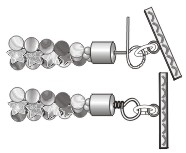
- Use a medium-large jump ring to attach clasp.
** Note: Why use a jump ring instead of sliding the clasp on in step 3a? In many cases, the extra ring adds needed flexibility to the bracelet, making it easier to clasp. Also, if the bracelet gets badly caught on something, it is better for the jump ring to pull open, rather than a more difficult-to-fix part. ** - Repeat steps 1-3 for other side, using other half of clasp, checking the length as you go.
Hint: If you haven't done wire wrapping before (and especially if you are using Sterling parts) then use a few plated eye pins to practice step 3 before you make your final version.
 But before you crimp this bead, make this test:
 Pull the loose cord ends tight, and carefully hold them. String the bullet end along the eye pin, and against the eye. How well do your beads fit into, or up against this bullet end? If you don't like they way it looks, pull off the crimp, eye pin and bullet end, and rearrange a few end beads, perhaps using smaller beads. Repeat until you like the fit, and then finish the step:

Return/Go to Main Project Page
Designer Tip Sheets