Wire Wrapped People — Project #68-002-13
Parts & Tools: |
|
Approx. 26" of 20 gauge wire — Any metal. Very soft wire such as Copper wire can be difficult to control, but is inexpensive and a good practice wire. |
| Assorted Charms |
| Cutters |
| Round Nose Pliers |
| Non-Serrated Flat Nose Pliers |
Instructions for the Man:
- Cut wire in half. Approx. 13" of wire is needed to make top and bottom of the man.
- Making the top loop and head:
- Using a pair of Round Nose Pliers, approx. 8mm from the tip of the pliers, grasp the center of the wire. The wire should now be smiling at you.

- Hold firmly and with one finger on each side (follow illustration 2-2, steps 1 - 4), push wire towards you and around pliers until a loop forms. Loop should be on the top of the wire with each end facing down. It's now frowning at you.
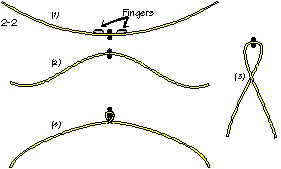
- Make the Head by bending the wire around something approx 8-9mm round. An ink pen works well. Make sure it is round and has no ridges.

- Twist both ends around each other one time to close the circle and to form his neck. Twist while still on pen.
- Using a pair of Round Nose Pliers, approx. 8mm from the tip of the pliers, grasp the center of the wire. The wire should now be smiling at you.
- Making the arms:
- Make an arm by measuring out approx. 3/4-inch (or 18mm) from the neck to the tip of the thumb. At the tip, bend down, around and back, to form the thumb. Gently close, using Non-Serrated Pliers, leaving a small loop at the tip for the thumb.
Note: Be sure to use Non-Serrated Pliers, and always grasp wire gently so as to not mark wire.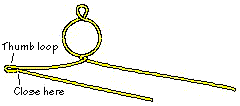
- This step forms a loop which comes straight up out of the page towards you. It will be a loop for hanging charms. With the man facing you, grasp just to the right of where you closed the thumb. Bend the wire straight up towards you. Use round nose pliers to grip it about 2mm up from that bend, and use your fingers to push the wire back down around the pliers (into the page), to make an approximately 2mm loop.
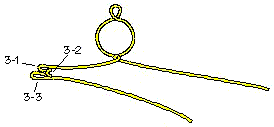
- Measure out past the base of the thumb, approx. 5mm total, and make a loop to form the rest of the hand. Again bend wire around and back towards the base of the arm.
- Slightly bend up to arm and start coiling wire around arm, going back towards the head. Make sure coils are close together and secure. Stop about 5mm from the neck.
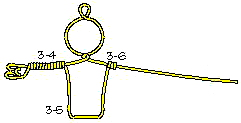
- At the last coil, bend straight down to start the body. Make approx. 13mm long then bend wire at a 90 degree angle to form the waist (about 7mm long).
- Bend back up and make a couple coils on the opposite arm. Trim any excess wire in the back of Man.
- Repeat steps 3a, c, & d to make the other arm, making sure coils meet together in the back.
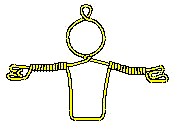
- Make an arm by measuring out approx. 3/4-inch (or 18mm) from the neck to the tip of the thumb. At the tip, bend down, around and back, to form the thumb. Gently close, using Non-Serrated Pliers, leaving a small loop at the tip for the thumb.
- Making the legs and feet:
- Find the center of the wire and hang from the waist at this point. Carefully start coiling the wire around the waist. Make about 5 coils, being sure to use both sides of the wire to keep each 'Leg' the same length (a couple coils on each side). Keep waist's wire as straight as possible. You may have to gently re-straighten.
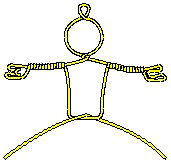
- Gently adjust coils with Flat Nose Pliers to get them close together but avoid crimping them too tight. Legs should be able to swing.
- Using Round Nose Pliers, make his hips. Slightly bend the wire down, approx. 5mm from the last coil. Just a little bend will do. It may be easier to do one leg first, to keep the wire up and out of the working area.
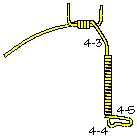
- Now measure down approx. 23mm from the hip. Using the Round Nose Pliers again, bend wire around and up to make his heel on his boot. Heel should be about 2mm wide, and feet should be pointing out.
- Measure out from the heel about 6mm and bend up and back around towards the leg to make the tip of his boot. At the leg, start coiling up, wrapping tightly and close together. Stop about 4mm from the hip.
- Trim excess wire, making sure it is in the back and hidden from sight.
- Continue with the second leg, using Steps 4c-f. Don't forget the remaining hip, and make sure feet face out.
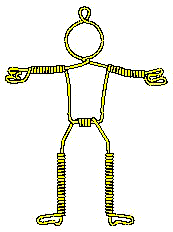
- Find the center of the wire and hang from the waist at this point. Carefully start coiling the wire around the waist. Make about 5 coils, being sure to use both sides of the wire to keep each 'Leg' the same length (a couple coils on each side). Keep waist's wire as straight as possible. You may have to gently re-straighten.
Instructions for the Woman:
- Cut one piece of wire about 13". This will be for the Head and Body. Her skirt will need to be about 11".
- Follow the same Head and Body directions (Steps 1-3g.) for the man but make the waist more curved so that it comes to a slight point.
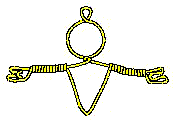
- Make the Skirt and Legs:
- Approx. 30mm from one end of the 11" piece of wire, make a loop about 4mm round.
- Using the long piece of the wire (the working wire) and starting right to left, measure down about 22mm from the bottom of the loop and bend to the left. Use Round Nose Pliers.

- Go out about 10mm from the above bend and bend wire down to form a leg. Make a 90 degree angle. Measure down 6mm and then bend right or in the same direction as skirt to make her heel and foot.
- Bend the tip of the foot up and around, back towards the leg. Tip of foot should be about 3mm round. Foot is about 8mm long.
- Start coiling up the leg to the edge of the skirt. This should be about 4-5 coils.
- Now bend wire back to the left (approx. 10mm); then down again to make the remaining leg and foot. Follow steps 3-3 and 3-4; make sure feet face out.
- Finish skirt by measuring to the left again about 10mm and then bend up, back to the waist.
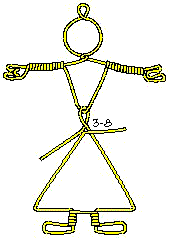
- Hang loop from Step 3-1, at the waist.
- Bend the working wire at about a 45 degree angle, straight out to the right and wrap around the wires from Step 3a. Wrap about 3 to 4 times. Make sure skirt is hanging correctly, if not, a slight twist (not more than 90 degrees) at the top loop will fix it.
- Tighten and trim excess wire.
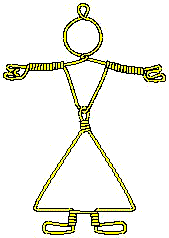
Options:
- Use a jump ring to dangle charms from the loop in the hand.
For example: make a pair of gardeners by having the lady hold a basket of flowers or a hoe, and have the man hold a rake.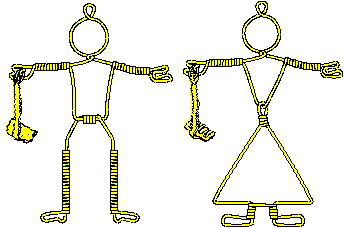
- Put a cowboy hat on the man's head by using a jump ring through the loop on top of his head, and put a saddle in his hand.
- To make a skirt without legs and feet, use about 8" of wire.
- Make earrings out of a pair of people, with an earwire through the top loops.
- Try more than one color of wire — a silver top half, and a copper bottom half, or make all the regular people instructions in silver, and then accent with brass designs.
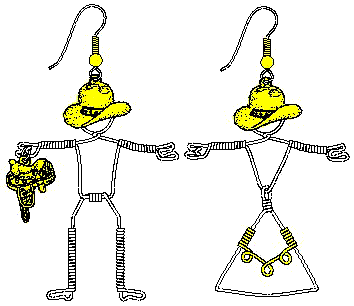
- Wire a hat first and then a head.
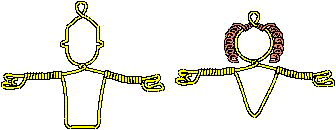
- Experiment with making coils of hair for the girls.
- Make a Christmas ornament by putting a present charm in the hand.
- Hang from a chain.
- And lots more!!!
Return/Go to Main Project Page
Designer Tip Sheets