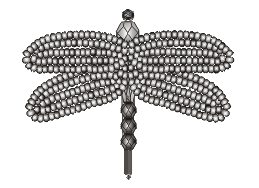
Beaded Dragonfly Barrette — Project Sheet #68-002-18
Parts: |
||
| 40" | 46-708-03 | 28 Gauge ColorCraft® Copper Wire - Green |
| 1 | 30-125 | 25x5mm Long Catch Barrette |
| 1 | 23-443-021 | 3mm Round Czech Glass Beads - Black |
| 3 | 23-444-363 | 4mm Round Czech Glass Beads - Green Iris |
| 1 | 23-446-342 | 6mm Round Czech Glass Beads - Olivine |
| 1 | 23-417-342 | 5x7mm Teardrop Czech Firepolish Bead - Olivine |
| 1 | 20-303-363 | 7mm Bugle Bead- Green Iris |
| 375 | 20-228 |
Japanese Seed Beads, mostly #360 Green Metallic, with some #270 Purple Metallic as accents. 375 is an approximate total number for the two colors combined. |
Instructions:
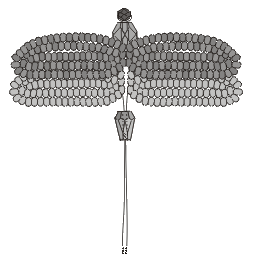
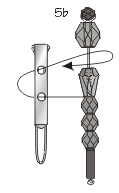
- Starting the Head and Body
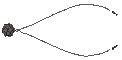
- Using all the wire, string the 3mm black bead. Push to the center of the wire.
- Twist the wire one time, as close as possible to the bead, to secure in place.
- String the 6mm round bead over both pieces of wire (called working wire) and push it up over the twist, getting it as close to the 3mm bead as possible.
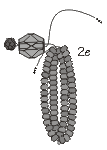
- Make the Wings.
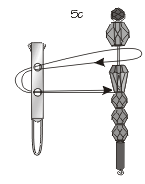
- Spread the working wire off to each side of the beads. On one wire, string 15 "base" beads. Vary the bead colors, mixing the 2 colors. NOTE: More Green will balance the look to match the body.
- With approx. 2mm of wire on each side of the 15 beads, gently bend the working wire back onto itself making the wing tip.
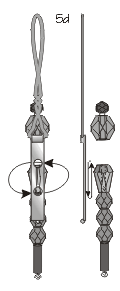
Now where the wire meets the last bead (the one farthest from the body) twist the working wire around the "base" wire up close to the bead, one time. This will leave a small (approx. 1mm) loop. - String approx. 17 beads (enough to fit snug against the "base" beads, and just past the first bead) back down towards the body. At the 1st bead nearest the body, again twist the working wire over the top of the "base" wire. Get it up close to the 1st bead. There should be a small space between the twist and the body.
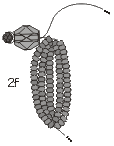
- Again string approx. 17 beads, working back out to the tip of the wing. Pull wire through the loop made in step 2b. Pull tight so all 3 rows of beads are side by side.
- With approx. 21 beads, string back down to the body and twist wire over and around the "base" wire. Always wrap over the top and around; this will make a top and bottom to each wing.
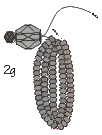
- The working wire should now be by the body and heading back out to the wing tip. String approx. 19 beads and pull wire into the loop at the end. Beads should be as close as possible to the body and at the tip of the wing the loop should be hidden by beads on either side of it.
- Now pull the working wire down through the opposite side and through all the seed beads of the outside row, coming out at the body. This part can be very frustrating or can go very easy!
*HINT: It is helpful to the beads as straight as possible so that the wire will go straight into them. If the wire hangs up, try pulling it out at that point and then continuing again from there. - Start the next wing with the same working wire on the same side of the Dragonfly. Use steps 2a.-g. Arrange this wing to be slightly under the first one. Leave wire off to the side and out of the way.
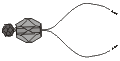

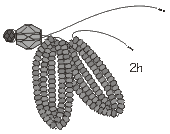
- On the opposite side, complete the other 2 wings using steps 2a-h.
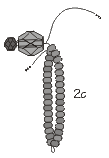
- Finish the body.
- Once all four wings are done, arrange them so the lower wings are slightly under the top ones and squeeze them all close together to hide any hole made from the gap between the 2 sides.
- String the teardrop bead over both working wires with the larger end of the bead closest to the head.
- Push up as close as possible to the wings (you may want to push it slightly under the wings). Again be sure no hole shows.
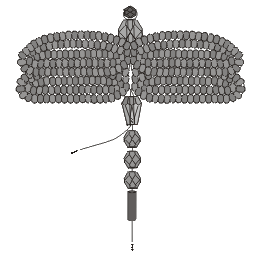
- String all three of the 4mm beads and the Bugle bead on only one of the working wires. Push the unused wire off to the side.
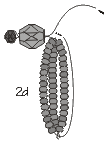
- Pull the bottom wire tight, and using round nose pliers or something with a small point (awl, push pin, etc.), wrap the wire 2 times around to form a loop approx. 1-2mm round. Be sure to get the loop up snug to the bugle bead. This will hold the beads in place.
- Now pull wire through the loop one time, then carefully trim any excess wire. DO NOT cut the other piece of wire.
- Attach Dragonfly to barrette.
- With the hinged part of the barrette up under the 6mm bead, string the remaining wire into the hole at the opposite end- the one farthest away from the hinge.
- Now pull the wire up into the hole under the 6mm bead. Take the wire up and over the body, right between the 6mm bead and the wings.
- String back into the 1st hole and up into the back hole. Pull up and over the body again, this time between the smallest point of the teardrop and the 1st 4mm bead.
- Pull back down into the back hole and then up into the first hole a final time, but this time don't go over the body. Between the body and barrette, wrap wire many times (about 5 times) around the wires that secured the Dragonfly to the barrette.
- Trim remaining wire. Be very careful to cut only the excess. Wire should be well hidden under the wings.
- Shape the wings with a small curve in the middle of each wing, and angle them slightly back.


Other ideas for this Project include:
|
|
Instructions by Angela Womach
Illustrated by Pat Eggers
© Rings & Things
Return/Go to Main Project Page
Designer Tip Sheets