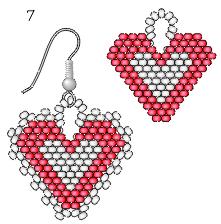
Beaded Heart Earrings — Project #68-002-19
Parts: |
||
| 40 | 20-228-41 | Japanese Seed Beads, size 11/0 - White (or optional, pink Ceylon) |
| 75 | 20-228-45a | Japanese Seed Beads, size 11/0 - Red |
| 90" | 61-119 | Nymo Cord |
| 1 | 65-030-12 | Needle, size 12 "sharp" |
| 1pr. | 34-223-1 | Surgical Stainless Steel Earwires - White |
Instructions:
- Using half the cord, string the needle.
- Now anchor a bead at the end of the cord, about 1" from the end, by stringing any bead and tying it in place. (Do not knot it firmly; this bead comes off at the end of the project.) This anchor bead will make holding the project easier and stop beads from falling off. This will be considered the left side of the project.
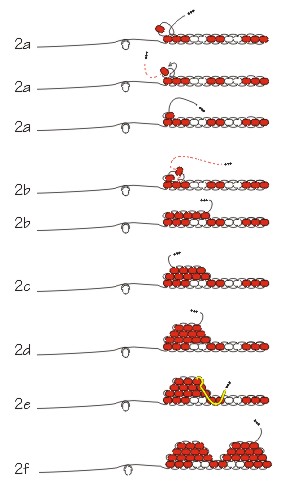
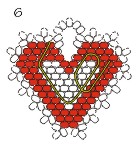
- Starting with the widest row (Row 1), string 3 Red beads, 2 White, 2 Red, 2 White, and 3 more Red.
Make a "Ladder Stitch". This stitch is the foundation for the "Brick Stitch" which is used for this earring. Push the beads toward the end of the cord, about ½" from the anchor bead. Now string back through the second bead from the end of the working cord (the cord with the needle). Be sure to go through the left side of that bead. - Now continue going through each bead in line. Be sure to go in the left side hole first. When finished, the working cord should be next to the anchor bead.
- Pull tight. Beads should now be facing with their holes up and down.
- Start the "Brick Stitch".
- Starting from the last bead on the left (the side with both pieces of thread), string a Red bead and hook needle through the cord between the 1st and 2nd beads. Pull thread through, and then pull needle back down into that bead, going in the same hole that the needle just came out of.
- Pick up another Red bead, add it like in 2a, and continue down the row until you have added 5 beads total. Row 2 has 5 Red and stops in the middle of the row. Be sure to pull the beads tight and close to one another.
- For row 3, add 4 Red beads, working up to the top of the heart, and back out towards the end.
- The very top row, Row 4, has 3 Red beads.
- From here, pull needle down through the rows to Row 1 and come up and out of the 7th bead from the left (a red bead) just past the middle of row 1.
- Now repeat steps 2a.-d. on the opposite side of the heart.
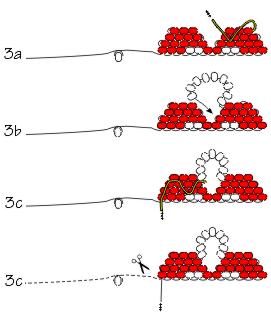
- Make the loop on top of the heart.
- Zigzag the needle down and over to Row 3, coming up the last inside bead in that row.
- String 8 White beads and thread through the opposite side of the heart, to connect.
- Now zigzag again, over to the very first bead in Row 1, where the anchor bead is. Come out the bottom of this bead and tie a knot to the anchor bead cord.
- Carefully trim the anchor bead cord.
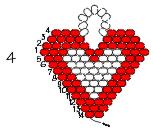
Be sure not to cut the working cord! - Continue heart working down from Row 1. Notice that the rows decrease by one as they are made.
Make each row as follows: - Attach the beaded fringe.
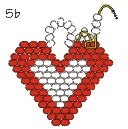
*NOTE: To make an earring without the fringe, stop now and go straight to step 6.* - Zig-Zag needle and thread back up to Row 4 (the very top row) and pull out of the 1st inside Red bead on the right side of the heart.
- From here, string 3 White beads and thread down into the next hole over. Go down into the next row and then back up and over, coming out of the last bead in the top row. Pull the beads tight so that the middle bead pushes out above the other 2.
- Now string 3 more Whites and continue down and around the heart. Connect to approx. every other bead or row, connecting into a bead. There should be about 16 groups of these Whites beads. Be sure to pull tight so that the top bead pushes up above the others.
- When finished on the opposite side, secure thread by zig zagging up and down between all the rows in the middle of the heart. Trim the cord.
Hint: Zig zagging around the beads not only secures the thread to finish a project, but is also the method for adding more thread if you run out and need a new piece of thread to finish a project. - Attach earwire to loop.
![]()
![]()
![]()
![]()
|
Row 5- 2 Red, 3 White, 1 Red, 3 White, 2 Red Row 6- 2 Red, 6 White, 2 Red Row 7- 2 Red, 5 White, 2 Red Row 8- 2 Red, 4 White, 2 Red Row 9- 2 Red, 3 White, 2 Red Row 10- 2 Red, 2 White, 2 Red Row 11- 2 Red, 1 White, 2 Red Row 12- 4 Red Row 13- 3 Red Row 14- 2 Red |
|


© Rings & Things,
Return/Go to Main Project Page
Designer Tip Sheets