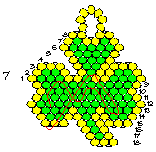
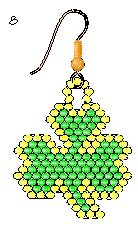
Shamrock Earrings — Project #68-002-20
Parts: |
||
| 90 | 20-228-388 | Japanese Seed Beads, size 11/0- Light Sapphire Green |
| 75 | 20-228-108 | Japanese Seed Beads, size 11/0- Topaz SL |
| 90" | 61-119 | Nymo Cord |
| 1 | 65-030-12 | Needle, size 12 "Sharp" |
| 1pr. | 34-223-2 | Surgical Stainless Steel Earwires- Gold |
Instructions:
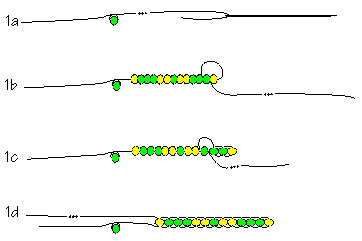
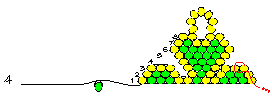
- Using half the cord, string the needle.
- Anchor a bead about 1" from the end of the cord, by stringing any bead and tying it in place. (Do not double-knot it; you will take this off at the end of the project.) This will be considered the left side of the project. This anchor bead will make holding the project easier and stop beads from falling off.
- Starting with one of the widest rows (Row 1), string a Topaz bead, 3 Green beads, 2 Topaz, 1 Green, 2 more Topaz, 3 Greens, and one Topaz. Make a "Ladder Stitch", which is the foundation for the "Brick Stitch" used for this earring. Push the beads toward the end of the cord, about 1/2" from the anchor bead. Now string back through the second bead from the end of the working cord (the side with the needle). Be sure to go through the left of that bead.
- Pull tight. Beads should now be facing with their holes up and down.
- Now continue this stitch with each remaining bead. When complete, notice that all the beads are facing with their holes up and down and the working cord is down by the anchor bead.
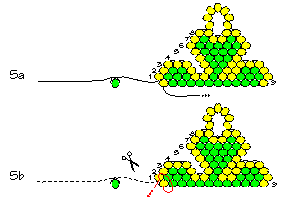
- Starting the "Brick Stitch".
- Starting from the last bead on the left (the side with both pieces of thread), and the anchor bead at the bottom, string a Topaz and Green bead and hook the needle through the cord on top of the beads, between the 2nd and 3rd bead. Pull thread through, and then pull needle back up into the green bead, going in the same hole that the needle just came out of.
- Pick up a Green bead and continue down the row, by hooking thread between the 3rd and 4th bead, and then going back up through the new green bead. Hook through the thread on top of the row every time.
- Finish this row with another Topaz bead.
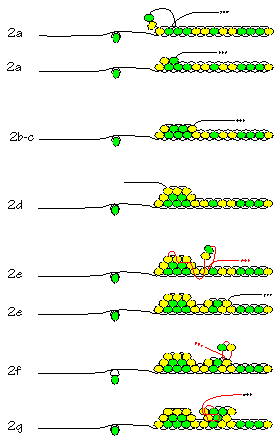
- Start with Row 3 now, stringing back towards the outside. String 2 Topaz beads at the same time and connect them to the cord between the 2nd and 3rd bead (this 2-bead method hides the cord at the beginning of rows). Connect a final Topaz bead is between the 3rd and 4th.
- Now thread cord over into the middle Topaz bead and go down through the rows to the 1st Row and come up through the 6th bead in the 1st row. (It's the second Topaz bead.) From here attach a Topaz and a Green bead, and hook them into the thread between the 6th and 7th beads. Then attach a Topaz bead, hooking it into the thread between the 7th and 8th beads.
- To start the next row, string a Topaz and a Green bead but instead of hooking between the 2nd and 3rd bead, hook between the 1st and 2nd. This method is adding a bead (lengthening a row). Notice that it slightly pushes the end bead out past the previous row. A regular "brick stitch", like the previous rows, reduces the number of beads in each row.
- Continue with this row by stringing another Green bead, and add a Topaz bead to the end of the row. To add at the end, string the bead and pull thread into the last bead of the row bead. String over into the second to last bead and back up into the bead just added.
- Continue the next 3 rows up as follows (using the adding method), pulling tight as rows are made:
Row 4 has a Topaz, 3 Green, and another Topaz.
Row 5 has a Topaz, 4 Green, and a Topaz.
Row 6 has a Topaz, 5 Green, and a Topaz. - Row 7 is a normal "Brick Stitch" and has a Topaz, a Green, 2 Topaz, a Green, and a Topaz. Hook the first 2 beads between the 2nd and 3rd beads of the previous row. (Notice this row reduces in length.)
- String 2 Topaz and attach to Row 8 (normal Brick Stitch). Now pull cord back into the 1st Topaz bead and down through the rows, then up and over to the 4th bead in Row 7 (the 2nd Topaz bead in the middle of the row). Come up through that bead and string 2 more Topaz beads to Row 8.
- Making the top loop.
- For strength, pull needle back down into the 1st Topaz bead of the last 2 that you strung, and down a couple rows, over a bead and come back up into that same 1st Topaz bead.
- String 7 Topaz beads and pull cord over to the 2nd Topaz bead of the first group. Now work cord down through the beads of the below rows and come out the top of the 9th bead of Row 1. It should be a Topaz bead on the right side.
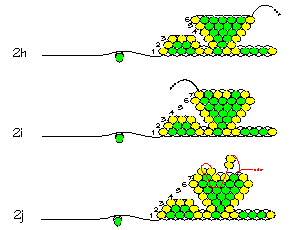
- Continue the right side of the Shamrock, by working upwards, using the normal "Brick Stitch".
Row 2: 1 Topaz, 2 Green, 1 Topaz
Row 3: 3 Topaz.
String back into the middle Topaz bead and down the rows to come out the last bead of Row 1. This should be on the opposite side of the anchor bead. - Finishing the Shamrock.
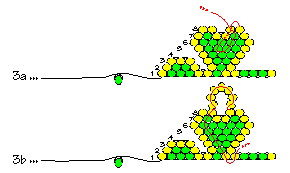
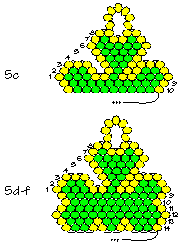
- Row 9 will attach to the bottom of Row 1. It is a normal "Brick Stitch" and has a Topaz bead, 10 Green, and another Topaz. Be very careful here not to miss a stitch.
It's very easy for the beads to overlap on the cord. - Now pull needle back over one bead and up the rows until it comes out the same bead as the anchor bead. Tie a small knot and carefully trim off only the anchor cord. Pull needle down into the last bead of Row 8.
- Work down, making Row 10. It is normal brick stitch and has a Topaz, 9 Greens, and another Topaz.
- Row 11 has a Topaz and Green bead added at the beginning (remember to hook onto the cord between the 1st and 2nd bead), 9 more Greens, and add another Topaz at the end, attaching it like in step 2g.
- A Topaz and Green bead are added to the beginning of Row 12 with 10 more Greens and another Topaz added at the end.
- Using the normal "Brick Stitch", make:
Row 13 with a Topaz bead, 3 Green, a Topaz, 2 Green, a Topaz, 3 Greens, and another Topaz.
Row 14 with a Topaz, 2 Green, and a Topaz; stop and go back over to the Green bead, down a row and over to the Topaz bead directly below the last one on Row 13. From here, come out that bead and start again with a Topaz and Green bead, and another Topaz. Again stop, go back into the Green bead, down a row and over into the Topaz. Here string a Topaz, 2 Green, and a Topaz.
*Notice: By stopping and starting at those 2 places on this row, the leaves became more defined and separate from the rest of the Shamrock. - Cord should now be on the outside of the fourteenth row. Attach 3 Topaz beads (Row 13) and take cord back into the middle Topaz bead back into Row 14 and 13, over towards the middle and back down into the 5th bead of Row 14, a Topaz bead.
- Make the stem.
- For row 15 (of the stem), string a Topaz and a Green bead and add them, by hooking into the cord between the middle Topaz and Green beads of Row 14. Then attach another Topaz normally.
- Now stitch normally, a Topaz and Green bead, then add another Topaz to the right side of Row 16.
- Add a Topaz and Green to Row 17, and finish it with another Topaz.
- And on the last row, Row 18, attach 2 Topaz beads then add the last Topaz to the row. Notice how adding beads alternating between the beginning and end of the row, but always at the right side, made the stem curve slightly to one side.
- Now string cord back up the beads in the stem to Row 13. Come out the Green bead, 6th bead in from the end of the side with only 14 rows. Pull cord to the left and into the next bead (a Topaz), then straight down into the Topaz bead in Row 14. From here, brick stitch 3 Topaz beads
to complete the beading of Row 15. - String the cord into the middle Topaz bead and "Zigzag" the cord back up and into many different rows of the Shamrock. Be sure to go up and down and cover a number of rows. This will hold the stitching in place without tying a knot.
*Note: This step can also be used to add more cord if necessary.* - Trim cord.
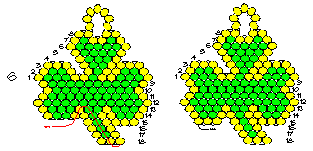
- Open the bottom loop of an ear wire to attach the ear wire to the earring's loop.
- Repeat steps 1-8 for the second earring. Turn the earring over (left to right) after finishing it, to have a mirror image of the first earring, before attaching ear wire.
Return/Go to Main Project Page
Designer Tip Sheets