Beaded Roses — Project #68-002-21
Welcome to the www.rings-things.com project archive.
Suggested Parts: |
||
| 770 | 20-228 | Japanese Seed Beads, size 11/0 - Assort. Colors |
| 240 | 20-228 | Japanese Seed Beads, size 11/0 - any Dark Green |
| 84" | 46-706 | 26 gauge Artistic Wire - any color for a Rose |
| 41" | 46-706-03 | Artistic Wire, 26 gauge - Green for the leaves |
| 1 ea. | Cloth Wrapped Wire* | |
| Dark Green Floral Tape* | ||
| NOTE: The colored wire that you choose should match the bead color, but does not have to be exact. For example, use red wire with red beads, or gold wire with yellow beads. The wire will only show slightly, and even less with practice. Try different combinations of colors for different highlighted looks. | ||
| *These items can be purchased at any Craft or Floral supply store. | ||
Instructions:
- Making the Calyx Leaves:
Note: Pictures shown may have more or less beads than what the directions will call for.
Follow the amount of beads used in each step and look at pictures to get the general idea. With a seed bead and wire project like this, the actual number of beads may vary, due to variations in the bead sizes and different people's wire wrapping techniques. - Cut 4 pieces of Green wire, each approx. 6" long. Using round nose pliers, make a loop at one end of each, about 2-3mm round.
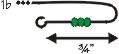
- Using one piece of wire, string 3 Green beads. This will be the "Base". Starting just inside the loop, measure ¾" toward the other end of the working wire. At this end, bend wire around and back onto itself.
- With the 3 beads in the middle of the "base" wire, put a twist right behind the 3 beads using the working wire. Once around should be enough.
- Now string the remainder of the beads for this leaf, approx. 29 more. Make another loop or bend on the end of the working wire so that beads do not fall off.
- Push approx. 6 beads up to the twist of step 1c. (enough beads to fit snugly up against the "base" beads). Pull up close to the 3 "base" beads and bend wire around the outside of them to the opposite end and twist once. Be sure to go over the top of the "base" wire when twisting. Going over the top every time will make a front and back to the leaves. The back will have all the loops on it.
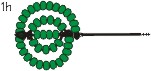
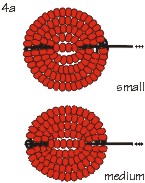
- Continue around until there are 5 rows across. Be sure to pull beads tight, keeping rows side by side as much as possible to hide wire. (The example here is shown exaggerated... try to keep your wires closer together.)
- After 5 rows, working wire should be at the bottom (away from the loop in step 1a). Twist wire around the "base" a couple times and pull off any extra beads.
- Turn leaf over, so the back is toward you. Bend the top loop (1a) flat toward the center of the leaf. Do the same thing with the looped wire on the opposite end. (This helps hold the final twists of 1g in place.) Leave the remaining working wire straight down the bottom to make the stem.
- At the top of the piece (the end with the loop from step 1a), gently pinch the beads to form a slight point.
- Repeat steps 1b-1i to form the 3 remaining Calyx leaves and set aside.
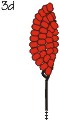
- Making the larger leaves:
- Cut one piece of Green wire approx. 7" long for the small leaf. Make a 2-3mm loop at one end.
- String 4 Green beads and make a "base" like in step 1b. but measure out 1" instead of ¾".
- Follow steps 1c - i. but use approx. 40 beads.
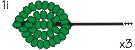
Make 5 rows across, as in step 1. - Now make one Large Leaf following the above steps but use
these measurements: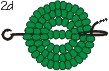 - cut a piece of Green wire 9" long
- 4 Green beads on the "base"
- "base" wire should be 1" long
- make 7 rows across
- use approx. 70 beads - Set aside both leaves.
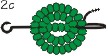
- Making the Center Petals:
- Cut 2 pieces of colored wire, both 10" long. Make a loop at one end of each.
- Make the "base" wire like in step 1b. but use 4 Colored beads and measure out 1" instead of ¾".
- Now follow steps 1c - h, but use 7 rows and approx. 75 beads.
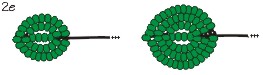
- After completing the petal, gently cup it, with the back of the petal on the inside of the "cup". (Remember the back is the side with all the loops.) The petal should now be kind of like an oval fruit bowl.
 Notice: Do NOT pinch petals to a point. Petals should be rounded at the end.
 - Repeat the above steps using the remaining 10" piece of wire.
- Now take both center petals and face them so they are cupping one another, then gently twist their stem wires together.
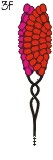
- Making the Outer Petals.
- Make a total of 5 outer petals with the following amounts:
- 3 Small Petals:
- cut 3 pieces of colored wire 12" long
- 4 beads on the "base"
- "base" wire should be 1" long
- make 9 rows across
- use approx. 120 colored beads
- 2 Medium Petals:
- cut 2 pieces of colored wire 13" long
- 6 beads on the "base"
- "base" wire should be 1" long
- make 9 rows across
- use approx. 130 colored beads
- When all 3 small petals are complete, gently curve them so that they fit around the center petals.
The curve will not be as tight as the center petals. Be sure the back of the petal faces out, away from the center petals. - Now bend down the very top of the petal, to give the look of the rose opening. Be careful not to lose the shape of the curve.
- Gently twist the stems to the center petals.
- Repeat steps 4b-d with the 2 medium sized petals.
- Shape rose to desired form. For a rose bud, squeeze tightly shut.
Open wider for a more mature rose. - Add the Calyx Leaves (the 3 small leaves) by wrapping the wire of each leaf around the rose stem. Be sure to spread them out so they cover as much of the exposed wire from the petals as possible.
- Insert the Cloth Wrapped Wire, about 5" long, into the middle of all the wires of the stem. Wrap the wires around it to secure. Anything much longer than 5" may cause the flower to droop due to the weight of the rose.
- Attach the leaves to one another by twisting together then wrap using the Floral Tape. Be sure to hide the wire on both. The less Tape used the better it will look. Now wrap the leaves to the long stem of the rose.
- Using the Floral Tape, wrapped all the stems on the flower to hide the wires and help secure the flower to the 5" long stem. You can wrap just part way, or the whole 5" stem can be wrapped. Shape as desired.
![]()


Options:
Stick Pin:
- Using a stick pin or hat pin with a head, wire the stems of the flower and the calyx leaves to the pin (do not use regular leaves). Wrap up close to the head of the stick pin and cover with Floral Tape. Do not wrap wire too far down the pin because it should not interfere with a person's clothing.
- Make a Hat Pin, using the stick pin instructions.
- Try color variations of beads on the tips of the Rose petals to give a 2 tone look.
- Add more petals to open up a more mature Rose. Nine petals works well for this.
Illustrated by Pat Eggers.
Return/Go to More Free Tutorials in our Design Gallery