Wire Snowflakes — #68-002-22
Parts and Tools: |
||
| 15" | #47-038 | Silver Plated Wire, 20 gauge |
| 20" | #47-034 | Silver Plated Wire, 24 gauge |
| 12 | #20-315 | Bugle Beads |
| 48 | #23-444 | 4mm Czech Faceted Beads- we used AB beads |
| 6 | #23-446 | 6mm Czech Faceted Beads- we used AB beads |
| 12 | #23-448 | 8mm Czech Faceted Beads- we used AB beads |
| #65-200 | Round Nose Pliers | |
| #65-500 | Wire Cutters | |
Instructions:

- Cut wire.
- Using the 20 gauge wire, cut three 5" pieces of wire.
- With the 24 gauge, cut a piece approx. 12".
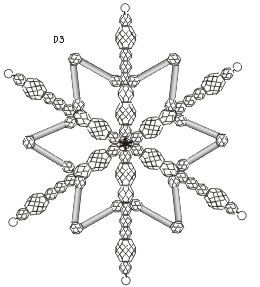
- Making Snowflake base: (pictures shown approximately 50% actual size)
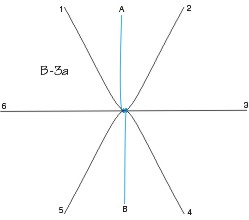
- Take 2 pieces of the 5" wire and gently bend each into an approximately 60° rounded "V". To keep from getting a sharp "V", you may want to bend them around the middle of a pair of round needlenose pliers.
- Position the remaining straight 5" piece in between the 2 curved pieces, curves facing out. There should now be 6 rays for the snowflake.
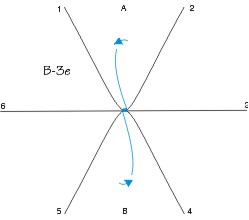
- Using the leftover 8" piece of 24 gauge wire, wrap the 2 curved wires to the middle straight wire:
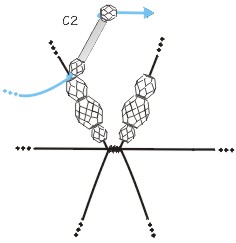
Note: This is the hardest step and takes some practice! Although this wrap works well and is small enough not to show, we recommend soft soldering the pieces together instead, if you have that option. - Carefully wrap vertically around the center of the pieces, about 3 times.
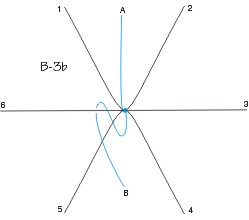
- Then take the bottom wire (B) over the tops of wires 5 and 6, down between wires 1 and 6, around and behind wire 6, back up between legs 5 and 6, and then back to the middle front where you started.
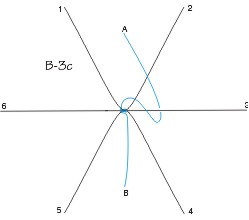
- Now take the top wire (A) over the tops of 2 and 3, then down between 3 and 4, under and behind 3, back up between 2 and 3, and then up into the middle top where you started.
- Gently pull wires A and B tight toward the middle.
- Now twist wires A and B together to secure the base. Trim the twist (leaving about 4mm twisted) and gently bend this on top of itself.
This will be the back of the snowflake. - Gently adjust the points so that they are evenly spaced and sticking straight out. The snowflake will feel fairly wobbly; don't worry too much at this time. It will tighten down in a later step.
- Stringing beads:
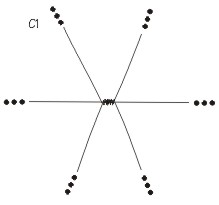
- String a 4mm, 8mm and 6mm Czech firepolish bead onto one point of the snowflake.
- Starting approximately 2" from one end of the 12 piece of 24 gauge wire, wrap one time around the wire above the 6mm bead. Be sure the loop of this wire is in the back of the snowflake.
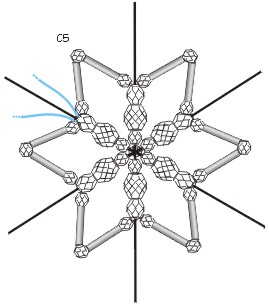
- Now string a 4mm bead, a bugle bead, a 4mm Czech, another bugle, and another 4mm onto the long piece of the 24 gauge wire.
 At the second 4mm bead, gently bend wire so that the bugle beads and the first and third 4mm are across from one another.
 - Repeat steps C1-3 on all remaining points, continuing around the snowflake, making sure the loop is in the back every time. By the time you get to the third point, the snowflake is starting to feel a lot sturdier.
- Take the 2" piece of wire (from step C2) and connect with the remaining length of the 24 gauge wire by twisting them together. Trim excess, leaving about 3mm which will be tucked in the back of the snowflake.
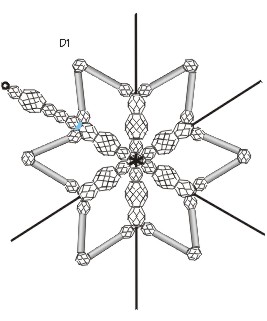
**Note: There is now a star forming on each point of the base snowflake. It will be sliding on each point but again, will be tightened up as directions continue. Make sure the loops do not come off the points. - Tightening the points:
- String three 4mm beads, an 8mm, and another 4mm on top of the loop from step C2 and onto one of the points of the base snowflake.
- Push beads down tight and make a loop at the top of the point, using the Round Nose Pliers.
*See loop directions at end - Continue stringing and looping off the remaining 5 points. Make sure to push them tight and snowflake should now be secure all the way around! Adjust spacing if needed.
- Hang snowflake from one of the loops onto a hook. An ear wire works well!
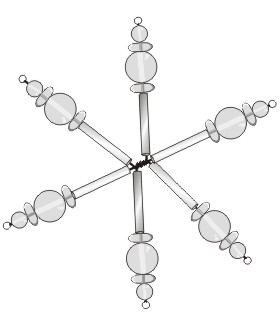
- #47-038 Silver Plated Wire, 20 gauge
#47-034 Silver Plated Wire, 24 gauge
#23-224 4mm Round Glass Beads - we used Clear Beads
#23-226 6mm Round Glass Beads - we used Clear Beads
#23-228 8mm Round Glass Beads - we used Clear Beads
#20-228 Japanese Seed Beads, size 11/0 (these fit very snug on wire!) - #47-038 Silver Plated Wire, 20 gauge
#47-034 Silver Plated Wire, 24 gauge
#23-224 4mm Round Glass Beads - we used Clear Beads
#23-228 8mm Round Glass Beads - we used Clear Beads
#23-236 6mm Wafer Beads
#20-309 20mm Bugle Beads
(these fit very snug and can chip easily.
Be very gentle when stringing them.)
#20-228 Japanese Seed Beads, size 11/0
(these fit very snug on wire!)
**Note: this shape does not have the added support in the middle so the center wrap must be very secure or soft soldered.
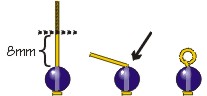
* - String selected beads on the head or eye pin.
- Keep about 8mm (1/3") of wire.
Cut off any extra. - Use round nose pliers to grasp the wire just above the bead, at the arrow, and bend sharply away from you.
- Now use small round nose pliers to grasp the tip of the wire, and bend it smoothly around the pliers down close to the beads.
Try these other designs:
Tips and Hints:
 To make nice round loops on head or eye pins:
Return/Go to Main Project Page
Designer Tip Sheets