Beaded Christmas Tree Earrings — Project #68-002-23
Parts: |
||
| #20-228-081 | Japanese Seed Beads, size 11/0 - Bronze | |
| #20-228-108 | Japanese Seed Beads, size 11/0 - Topaz SL | |
| #20-228-372 | Japanese Seed Beads, size 11/0 - Emerald | |
| #20-228 | Japanese Seed Beads, size 11/0 - assorted | |
| 2 yd. | #61-119 | Nymo Cord |
| 1 ea. | #65-030-12 | Needle, size 12 "Sharp" |
| 1 pr. | #34-323-4 | Plated Brass Earwires - Gold Plate |
Instructions:
- Using half the cord, string needle.
- Now string 5 Topaz beads (Group 1) and push to the end of the cord, leaving about 1½ inches available for tying off.
- Run the needle back through these 5 "base" beads, forming them into a circle.
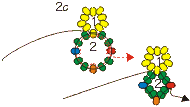
- String one Topaz bead, and go through the next already strung Topaz in the circle from 1b. Then pick up another Topaz and go through the next "base" bead in the circle. Manipulate the old cord to the inside of the circle and start pulling everything tight so that the newly added bead sticks out past the others. These will be the points of the star.
- Continue picking up a bead until there are 10 total in the circle, one strung between every other "base" bead. Make sure to push the points out above the "base" beads. Finish by going back through the 1st bead on the strand.
- Starting the Tree: Some steps can be tricky... add beads carefully, and go in the correct directions.
The "base" beads of the tree are Emerald beads. When it says to string a colored bead, use any color except Bronze. Bronze is for the stand. Make sure that as the tree forms, that the colors of the assorted beads (ornaments) are spread out. - String 2 Emeralds, 1 colored, 2 Emeralds, 1 colored, 2 Emeralds, another colored, and 2 more Emeralds. This will be Group 2.
- String into the bottom point of the star, stringing to the right, or clockwise. (You may need to flip your piece over to string clockwise).
- String back into all the Emerald "base" beads but not the colored ones. Again push the colored beads out like in step 1c. End with the needle coming out of first colored bead strung (the one on the right).
- Group 3: String 2 Emeralds, 1 colored, 2 Emeralds, another colored bead, and 2 more Emeralds. (Note: You added less beads for this group (6 emerald, 2 colored), because you will also use 2 Emeralds and 2 colored beads that are already part of Group 2.)
 Now thread into the bottom colored point of Group 2, up into the 2 Emeralds to the right, then again into the right side point which is now also the top point of Group 3.
Note: Make a note of what color bead the far right point is. Keep it in mind to recognize left side from right side. It can get confusing if sides get mixed up. - String around Group 3 again, pushing out the colored beads like in step 2c. Remember not to go into the colored ones. Now string cord up through all the beads up to the bottom point of the star (Group 1) and down the left side of Group 2, coming out of the left side colored bead.
- Group 4 is strung to the left and around. Again this group has only 6 Emerald "base" and 2 colored beads of its own. (Make sure the first colored bead you add, is a different color than the far right bead from step 2d.) String around again to push out points and end cord at the top of Group 2. Tie a knot with the 1½" piece of cord. As you carefully trim the remaining 1½" piece, do not trim the piece that has your needle attached!!!
- Continue making the tree:
- Now continue by stringing down and around Group 2, coming out its bottom point, and then into the bottom right side of Group 4 and out its bottom point.
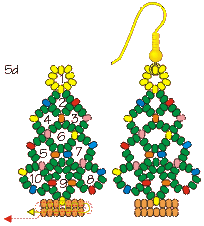
- Start Group 5 by stringing to the left, or counterclockwise. This bunch has 8 "base" beads and 3 colored points. String around again
pushing out the points and end at the right side colored bead. - From here, string 1 Emerald bead, a colored, and another Emerald. Make a circle by going around and into the right side colored point on Group 5. End at the opposite colored bead.
- Group 7: going down and to the right (counterclockwise), string 2 Emeralds, 1 colored, 2 Emeralds, another colored, 2 Emeralds, and then attach to the bottom point of Group 3 and finish with 2 more Emeralds. Attach to the right side colored bead of step 3c. (notice that as Group 7 is formed, Group 6 comes automatically).
- Go around pushing out points and end coming through the bottom point of Group 7.
- Making the bottom row on the tree:
- Group 8 will be strung down and to the right (clockwise). It has 8 Emerald "base" beads and 3 colored points. Continue around pushing out points and end at the left side point.
- Now string 2 Emeralds and go up into the bottom point of Group 6 (step 3c.). Continue down the left side with 2 more Emeralds, a color, 2 Emeralds, a color, and 2 Emeralds. String into the left side point of Group 8. Notice there is a small space between Groups 7, 8, and 9.
- Go around and push out points. End by coming out the left side of Group 9.
- Group 10 starts here, down and to the left. String 2 Emeralds, 1 colored, 2 Emeralds, another colored, then connect with the bottom point of Group 5, then add 2 more Emeralds before going into the left side colored point of Group 9.
- Finish Group 10 by stringing around again, pushing out points and end cord through the bottom point of Group 9.
- Making the tree stand.
- Using the Bronze colored beads, string 13 beads in a circle. String around to the right and up through the bottom point of Group 9.
- Continue through the first 3 beads to the right.
- Try to string these beads so that they lay on top of one another (7 on the bottom and 3 Bronze, 1 point, and 3 more Bronze on the top).
- Finish the stand with a Square Stitch.
- To do a Square Stitch, string down into the first Bronze bead on the bottom right hand side of the stand. Now go up into the 2nd bead on the top row, back down into the 3rd bead on the bottom row, up into the point on the top row, down into the 5 bead on the bottom row, up into the 6th bead on the top row and down into the 7th bead on the bottom row.
- From this bottom bead go up into the whole top row, down around into the bottom row and continue around again a few times until stand is firm.
- Going around will also secure the thread in place. End cord in the center somewhere and trim cord.
- Continue with the remaining earring.


Options:
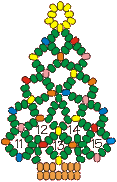
 A larger tree for a Pendant or Pin can be made by adding another row of 5 Groups (3 Groups made and 2 automatically made) before starting the stand.
To do this, continue from the bottom of Group 10, going down and to the right, and ending at the right side point. Do a step like 3c (forming Group 12) by stringing up and around clockwise and then continue with the next Group. Again go down and to the right forming the 13th Group. Do another like step 3c (forming Group 14) by going up and around. Group 15 will go down and to the right and will end coming out through the bottom point of Group 14.
Now add a Emerald bead and start the stand. String the top row of beads, add an Emerald and go up into the bottom point of Group 12, back down into the Emerald and through the top row and then string into the bottom row. Continue stand as in step 5.Designer: Kathleen Rice
Instructions by Kathleen Rice & Angela Womach
Illustrated by Pat Eggers
© Rings & Things
Return/Go to Main Project Page
Designer Tip Sheets