Beaded Bunny Earrings — Project Sheet #68-002-28
Parts: |
||
| 90" | 61-119 | Nymo Cord |
| 1 | 65-030-12 | Needle, size 12 "sharp" |
| 82 | 20-228-141 | Japanese Seed Beads, size 11/0 - White Ceylon |
| 176 | 20-228-41 | Japanese Seed Beads, size 11/0 - White |
| 36 | Various | Japanese Seed Beads, size 11/0 - Pink Ceylon (for the ears) |
| 4 | 20-228-49 | Japanese Seed Beads, size 11/0 - Black |
| 2 | 20-224-156 | Seed Beads, size 10-Light Pink (for the nose- darker than the ears) |
| 1 pr | 34-223-1 | Surgical Stainless Steel Earwires - White |
Notes:
- The "working cord" is the cord end with the needle.
Instructions:
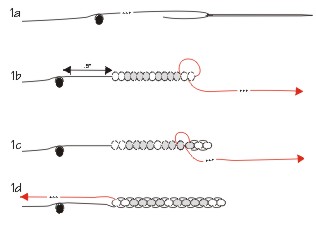
- Using half the cord, string the needle.
- Anchor a bead at the end of the cord, about 1" from the end, by stringing any bead and tying it in place. (Do not knot it firmly; this bead comes off later in the project.) This anchor bead will make holding the project easier and stop beads from falling off. This will be considered the left side of the project. Try to keep left & right in mind as earring is made.
- Starting with the widest row (Row 1), string 2 White, 4 White Ceylon 1 White, 4 White Ceylon, and 2 more White. Push the beads toward the end of the cord, about ½" from the anchor bead. Now string back through the second bead from the end of the working cord. Be sure to go through the left side of that bead.
- Now continue going through each bead in line. Be sure to go in the left side hole first. When finished, the working cord should be next to the anchor bead.
- Pull tight. Beads should now be facing with their holes up and down.
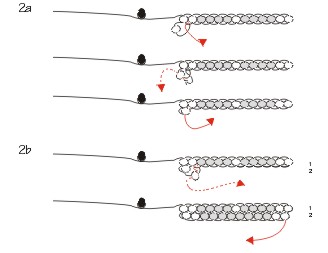
- Start the "Brick Stitch".
- Starting from the last bead on the left (the side with both pieces of thread), string a White bead and hook the needle through the cord between the 1st and 2nd beads. Pull thread through, and then pull needle back down into that bead, going in the same hole that the needle just came out of.
- Pick up another White, and add it like in 2a. Continue down the row until you have added 8 White Ceylon beads and 2 more White (Row 2). Be sure to pull the beads tight and close to one another.
- For Row 3, working back towards the left, add 3 White. Be sure to pull tight as each row is made.
- From the 3rd White bead, thread needle back into the middle White bead, then up through Row 2 (3rd bead from the end) and continue up into the 1st Row (4th bead from the end). Now go over to the 5th bead from the end and down to Row 2, 5th bead from the end.
- Now continue towards the left; attach 3 more White beads onto the middle of Row 3.
- Again take needle back into the middle White bead of the group in step 2e and all the way up to the 6th bead from the left side of the 1st Row. Go over and down into the 5th bead and down into the 4th bead of Row 2.
- Finish Row 3, to the left, by adding 3 more White beads.
- String needle over into the middle bead of this last group of beads and up through the 2nd Row and into the 4th bead of Row 1. Go down into the 5th bead, into Row 2 and out the 1st bead of the middle group of Whites (from step 2e.) of Row 3.
- add 2 more White to the last row, Row 4.
- Go back into the 1st bead of this group and zigzag your way up and over to the very first bead of Row 1. From here tie a small knot with the anchor bead cord and carefully cut off the remaining anchor cord. Do NOT cut the working cord!
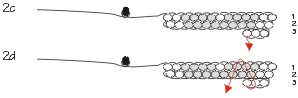
- Continue the "Brick Stitch" up the earring:
- Start Row 5 with 2 White beads, 3 White Ceylon, 2 White, 3 White Ceylon, and end with 2 Whites. Pull tight.
- Row 6 has 2 White, 3 White Ceylon, 1 Lt. Pink, 3 White Ceylon, and ends with 2 White String needle back into the 2nd White bead from the left, and down into Row 5, the 2nd White bead from the same end. Continue over (towards the middle) into the 3rd bead (a White Ceylon) and back up to Row 6 into the same 2nd bead from the end.
- Make Row 7 with 2 White, 1 Black, 2 White Ceylon, 1 Black, and 2 White
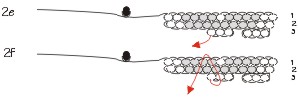
- Now start Row 8 by stringing 2 White beads onto the needle. Hook the needle through the thread between the 1st and the 2nd White beads of Row 7 and pull back up into the 2nd White bead. This is called adding a bead. Notice that it pushes the 1st White bead out past Row 7.
Continue Row 8 with: 5 White Ceylon and 1 more White - Now add a bead to the end of this row. String a White bead and go down into the last bead of Row 7. Go over into the 2nd bead and up & over into the added bead of Row 8. Needle should now be coming out the top of the very last White bead of Row 8.
- Row 9 is normal and has 1 White, 6 White Ceylon, and 1 White
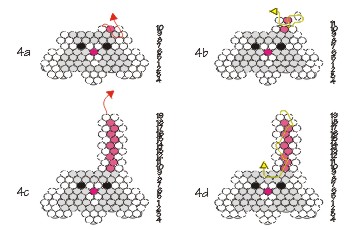
- Make the Bunny's Ears:
- Row 10 starts the ears. String a White bead, a Pink Ceylon, and another White bead. String back into the middle Pink bead and down into Row 9. Continue over to the end bead of Row 9, go up & out of the 1st bead in Row 10 (a White Ceylon).
- Start Row 11 by adding a White and a Pink bead. Remember to hook the needle through the cord of beads 1 & 2 on Row 10. Continue with another White bead.
- Continue up the ear (finishing one ear completely before starting the other) by adding a bead to the beginning of each row on up.
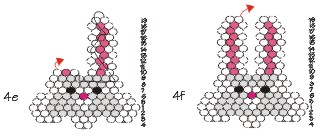
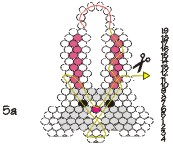
Rows 12-18 are exactly like the one in step 4b. - Row 19 ends the ear with 2 White beads. String back into the first bead and zigzag down the ear and over to the 5th bead from the right side (a White Ceylon) on Row 9.
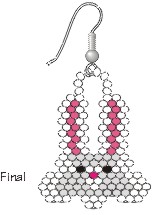
- Start Row 10, working to the left: string a White, a Pink, and a White
- Continue making the second ear, following the above directions 4b.-4d.; adding a bead to each row as it is built up the ear.
- Make the top loop:
- The needle should now be coming out of the inside White bead of Row 19, second ear.
From here string 8 White beads and go into the inside White bead of the opposite ear. - Now zigzag down and around various beads in the Bunny to secure the end cording.
- When it feels snug and won't pull free, carefully trim the working cord.
- Attach Earwire.
- Complete the other earring.
NOTE: This bunny is made in whites, to mix and match with the Easter Basket Earrings (project #68-002-31).
Instructions by Angela Womach
Illustrated by Pat Eggers
© Rings & Things
Return/Go to Main Project Page
Designer Tip Sheets