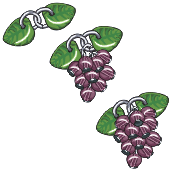
Grape Clusters — Project Sheet #68-002-29
Parts: |
||||
| 12-15 | #37-411-9 | 7/8" Thin Head Pin- Gunmetal |

|
|
| 2 | #37-123-9 | Sm. Oval Jump Rings- Gunmetal | ||
| 2 | #37-136-1 | Med. Round Jump Rings- White | ||
| 12-15 | #23-224-282 | 4mm Round Glass Bead- Amethyst | ||
| 2 | #23-629-347 | 9mm Glass Leaf Bead- Dark Olivine or | ||
| #49-102 | Antiqued Cast Leaf Charms | |||
Possible Charms: |
||||
| 1 | #49-928 | 3D Wine Glass w/Grapes Charm - Antiqued Silver | ||
| Or | #49-926 | 3D Wine Bottle w/Grapes Charm - Antiqued Silver | ||
Tools: |
||||
| 2 | Round-nose Pliers (1 pair is enough, but 2 pairs are better.) | |||
| 1 | Wire Cutters | |||
Instructions: |
||||
- Make a Grape Cluster. (The Grape Cluster looks good with anywhere from 12 to 15 beads.)
-
Make 12-15 "Grapes": String a 4mm Amethyst bead on a gunmetal head pin,
and make a loop. **See Head & Eye Pin Loop Directions.**
Repeat until you have 12 - 15 "grapes." -
Attach 2 grapes to another grape by connecting them loop to loop.
**See Jump Ring Hint on how to open & close loops.** - Connect 2 more grapes to the cluster by attaching one grape to each end grape, for a total of 5 grapes.
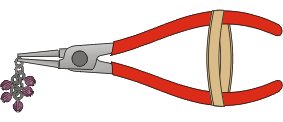
- Using pliers, grasp one of the very end grapes at it's loop, and let the bunch hang down. There should be a point at the opposite end, which will be the bottom grape. From the loop of this grasped grape, add the 2 Gunmetal Oval Jump Rings, one above the other.
- Adjust the hold of the pliers to the end Jump Ring.
**Hint: Wrap the handles of the pliers with a rubber band to hold in place.**
By holding up the cluster, start adding more Grapes up the bunch. Attach them anywhere needed, on other Grapes and onto the jump rings, filling in any holes. - Attach the leaves:
-
Attach a Medium Round Jump Ring to each leaf, and then use one leaf's
jump ring to connect the 2 leaves together.
Make sure the leaves are facing forward. - Attach the leaves to the top Oval Jump Ring of the Grape cluster. Again, make sure the leaves are facing forward.
- With a Leaf on each side of the cluster, decide if more grapes are needed and use the remaining ones as desired. Grapes may be hung from the bottom of the leaves to fill in space.


Instructions by Angela Womach
© Rings & Things
Return/Go to Main Project Page
Designer Tip Sheets