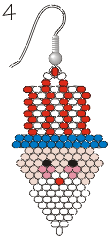
Uncle Sam Earrings — Project Sheet #68-002-32
Parts: |
||
| 20-228-258 | Japanese Seed Beads, 11/0 - Siam Silverline | |
| 20-228-478 | Japanese Seed Beads, 11/0- Dk. Sapphire SL | |
| 20-228-048 | Japanese Seed Beads, 11/0 - Crystal SL | |
| 20-228-313 | Japanese Seed Beads, 11/0 - Ivory Ceylon | |
| 20-228-013 | Japanese Seed Beads, 11/0- White Ceylon | |
| 20-228-153 | Japanese Seed Beads, 11/0 - Pink Ceylon | |
| 20-228-021 | Japanese Seed Beads, 11/0 - Black | |
| 20-228-211 | Japanese Seed Beads, 11/0 - Red | |
| 80" | 61-119 | Nymo Cord - White |
| 1 | 65-030-12 | Needle, size 12 "Sharp" |
| 1pr. | 34-223-1 | Surgical Stainless Steel Earwires- White |
Instructions: |
||
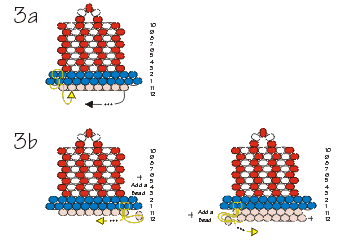
- Making the Hat Brim:
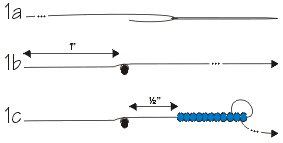
- Cut the cord in half and string the needle at one end. Set the remaining half aside.
- Anchor a bead about 1" from the far end of the needle side, by stringing any bead and tying it in place with a single knot. (Do NOT double-knot; this bead comes off later in the project.) This anchor bead will make holding the project easier and keep beads from falling off.
Consider this side of the project the left side. - Starting with the Hat Brim (Row 1), string 11 Sapphire beads. Start with a "Ladder Stitch". This is the foundation for the "Brick Stitch" which is the main stitch used for this project. Push beads to the end of the cord, about ½" away from the anchor bead. Now string back through
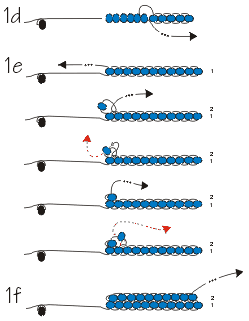 the second bead from the end of the working cord (the end with the needle). Be sure to go through the left side of that bead.
 - Continue going through each bead in line. Be sure to go in the left-side hole first. When finished, the working cord should be near the anchor bead on the left side. Put the anchor bead on the bottom with the working cord on top. Pull firm. Beads should now be in a skinny row with their holes up and down.
- Working up (Row 2), start the "Brick Stitch" - this stitch reduces itself by one bead as rows are made, unless a bead is added to the end or beginning of the row. String a Saph. bead and pull the needle through the cord between the 1st & 2nd beads of Row 1 and then back into the bottom hole of the newly strung bead. This bead should be sitting on top of Row 1.
- Continue down the row until there is a total of 10 beads. Cord should now be coming out of the last bead of Row 2 on the right side.
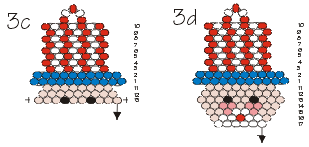
- Making the Hat Crown:
- Row 3 has a total of 7 beads (Siam & Crystal beads every other bead, starting with Siam) and starts between the 2nd & 3rd beads of Row 2. To get there, string cord over and down into the 2nd bead of Row 2, then down into the 2nd bead of Row 1. Now moving to the left, string into the 3rd bead of the same row and back up into the 2nd bead of Row 2. Now Using the normal "Brick Stitch", string a Siam bead, a Crystal bead, a Siam, etc. until there is a total of 7 (always start with a Siam colored).
- Now "add" a bead at the beginning of this row. "Adding" a bead allows the row to grow in size instead of decreasing. String a Siam & a Crystal bead and pull the needle through the cord between the 1st & the 2nd beads of Row 3. Now go through the bottom hole of the Crystal bead and pull tight. Notice that the Siam was pushed out past the row below it. Continue with the other beads, for a total of 7, switching colors.
- Repeat 2c. for rows 5-10.
- After 10 rows are complete, needle should be coming out of the last bead on the right of Row 10. From here, take needle to the left and down into the next bead then over & up into the 3rd bead. Now string a Siam, a Crystal, Siam, Crystal, and a Siam.
- Making a loop, pull down into the 3rd bead from the left side and work the cord all the way down to Row 1, coming out the very first bead with the anchor bead in it.
Tie a knot and carefully trim the anchor cord ONLY!! Leave the working cord to continue down the project. - Making the Face & Beard:
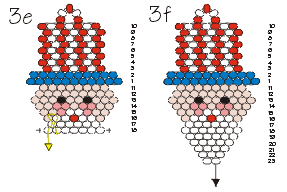
- The first row of the face will be Row 11. This row starts between the 2nd & 3rd bead of Row 1. To get there, pull cord up into the 2nd bead of Row 1 and up again into the first bead of Row 2. Now thread over and down into the 2nd beads of Row 2 & Row 1. Using the Ivory colored beads, "Brick Stitch" a total of 8 beads.
- Start Row 12 by "Adding" a bead (all of these are also Ivory) and also ending this row by "Adding". To "Add" a bead at the end of a row, string the bead and pull the working cord up into the 1st bead of Row 11 and then up into the 2nd bead of Row 1. Pull over and into the 3rd bead of the same row then back down and into the bead just added. Cord should now be coming out of the end bead of Row 12.
- Continue Row 13 the same way, by "Adding" at the beginning and the end.
This row has 10 beads - 3 Ivory, a Black (for the eyes), 2 Ivory, a Black, and 3 more Ivory. - Rows 14 - 17 are a regular "Brick Stitch", each decreasing in size by one bead.
Row 14 - 2 Ivory, 2 Pink (for the cheeks), an Ivory, 2 Pink, and 2 Ivory
Row 15 - 2 Ivory, 1 Pink, 2 White, 1 Pink, and 2 Ivory
Row 16 - 1 Ivory, 2 White, a Red (for the mouth), 2 White, and 1 Ivory
Row 17 - 6 White - Make Row 18 by "Adding" a bead at the beginning and end, using all White colored beads for a total of 7 beads. For the end bead, pull cord up into the last bead of Row 17 and up into the 2nd bead of Row 16. Thread over and into the 1st bead of the same row then go back down into the first beads of Rows 17 & 18.
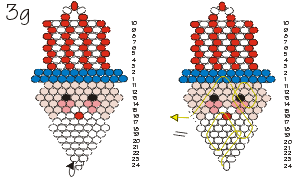
- Again continue the remaining beard with the normal "Brick Stitch".
Row 19- 6 Whites
Row 20- 5 Whites
Row 21- 4 Whites
Row 22- 3 Whites
Row 23- 2 Whites - The last row (Row 24) is just one White bead. Do not attach it to the cord between the 2 beads in Row 23, instead just thread it and then pull the cord straight into the opposite bead. Pull tight so that bead flips on its side and makes a point at the tip of the beard. To finish off the cording, zig zag the working cord up throughout many different rows of the beard & face. Be sure to go up and down until it feels secure and will not pull out. Trim cord when complete.
NOTE: This is also a way of adding cord to a project if necessary. Starting in the middle of the project, zig zag until secure and take working cord to the correct bead and start up again. - Attach Ear Wire.
- Make a second earring … either another Uncle Sam, or our matching 4th of July "Hat with Star Dangles" earring (68-002-36).
Instructions by Angela Womach
Illustrated by Pat Eggers
© Rings & Things
Return/Go to Main Project Page
Designer Tip Sheets