4th of July Celebration Set (Necklace) - Project Sheet #68-002-38
Parts: |
||
| 20-228-258 | Japanese Seed Beads, 11/0 - Siam Silverline | |
| 20-228-478 | Japanese Seed Beads, 11/0 - Dk. Sapphire SL | |
| 20-228-048 | Japanese Seed Beads, 11/0 - Crystal SL | |
| 31 | 20-303-042 | 7mm Glass Bugle Beads - Crystal |
| 6 | 23-666-042 | 6mm Glass Star Beads - Crystal |
| 3 | 23-668-042 | 8mm Glass Star Beads - Crystal |
| 170" | 61-119 | Nymo Cord - White |
| 1 | 65-030-12 | Needle, Size 12 "Sharp" |
Instructions:(starting with Necklace): |
||
- Making the Hat:
- Cut one piece of cord approx. 90" and string needle. This will give you plenty for the Hat and for the 2 twisted necklace pieces. Set remaining piece of cord aside.
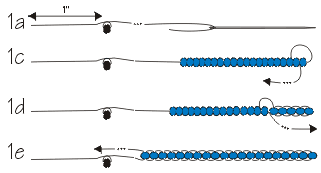
- Anchor a seed bead about 1" from the far end of the needle side, by stringing any bead and tying it in place with a single knot. (Do not double-knot; this bead comes off later in the project.) This anchor bead will make holding the project easier and keep beads from falling off. Consider this side of the project the left side.
- Starting with the Hat Brim (Row 1), string 20 Sapphire beads. Start with a "Ladder Stitch". This is the foundation for the "Brick Stitch" which is the main stitch used for this project. Push beads to the end of the cord, about an inch away from the anchor bead. Now string back through the second bead from the end of the working cord (the end with the needle). Be sure to go through the left side of that bead.
- Continue going through each bead in line. Be sure to go in the left-side hole first. When finished, the working cord should be next to the anchor bead on the left side. Put the anchor bead on the bottom with the working cord on top.
- Pull firm. Beads should now be in a skinny row with their holes up and down.
- Start the "Brick Stitch" – this stitch reduces itself by one bead as rows are made, unless a bead is added to the end or beginning of the row.
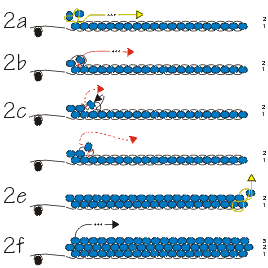
- The second row of the Brim (Row 2) has 21 Sapphire beads and works UP. This row will have a bead pushed out past each of the end beads of Row 1. To do this you must "Add" a bead to each end: The needle should be coming out of the top of the first bead of Row 1. Remember, the anchor bead is on the bottom left corner. String 2 Sapphire beads and pull the needle through the cord between the 1st and 2nd beads of Row 1.
NOTE: This may be the hardest part of this whole project! Be careful to keep the beads of Row 1 in a flat line, with the holes facing up and down. It's easy to get the row twisted. Also, be very careful when pulling the cord through each bead; there's a lot of it and it can easily get knotted. - Now string back into the bottom hole of the 2nd bead just strung, going in the same hole the that the needle just come out of. Gently pull snug. Notice that it pushed the first bead out past the end bead of Row 1. This is called "Adding" a bead.
- Continue with a normal "Brick Stitch" by stringing one Saph. bead and pulling the needle through the cord between the 2nd and 3rd beads of Row 1 and back up into the bead like in step 2b.
- Move down Row 2 to the right, using this stitch until you come to the last 2 beads of Row 1 (#'s 19 & 20).
- Now "Add" a bead to the end of this row. String a Saph. bead and pull the needle down through the last bead of Row 1. Take cord up and through the next bead to the left (#19) and then up and over back into the last bead just added in Row 2 (#21). The cord should now be coming up through the last bead on Row 2 on the right side.
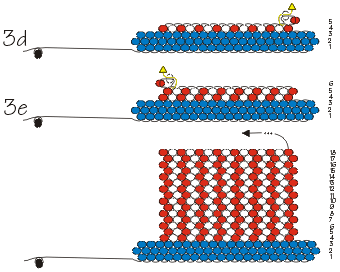
- Row 3 has 20 Saph. beads and works back towards the left. It is just a normal "Brick Stitch" all the way across. Notice that it is reduced in size by 1 bead. This completes the Hat Brim.
- Making the Hat Crown:
The whole crown is "Brick Stitch". Every row (but the very first one- Row 4) will start with an "added" bead, making each row have 15 beads in it- Siam, Crystal, Siam, Crystal, Siam, etc. - The needle should now be coming up and out of the last bead, on the left side, of Row 3. Pull needle over and into the 2nd bead of the same row and then down and over into the 2nd bead of Row 2. Now take the needle to the right and up into the 3rd bead of Row 2; continue up and into the 3rd bead of Row 3. The working cord should now be coming up, out of the 3rd bead from the left of Row 3.
- Start Row 4 by stringing a Siam bead and "Brick Stitch", connecting it to the cord between the 3rd & the 4th bead of Row 3. Again pull cord back into the same bead.
- Continue Row 4 by attaching a Crystal bead, another Siam, Crystal, etc., until there are 15 beads total, ending with a Siam bead. This row should be centered on top of Row 3, with 2 spaces on either side.
- Row 5 also has 15 beads (again Siam & Crystal every other bead). Start this row by "adding" a bead. String a Siam & a Crystal and attach between the last 2 beads of Row 4. Pull working cord back up through the Crystal bead.
- Work up making Rows 5 through 18. Be sure to start each new row by "adding" a bead and changing colors every other bead. Notice that as the Crown is built up, the red & white stripes are formed.
- Making the dangles at the bottom:
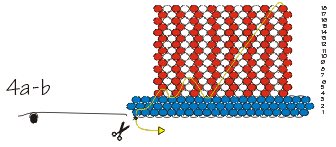
- Row 18 of the Crown should have ended on the top right side of the project. Thread the working cord back over and into the 2nd bead (a Crystal) and work your way down throughout the hat until you come out the very first bead of Row 1- the bead with the anchor bead. Needle should be coming out the bottom right next to the anchor.
- With the 2 cords side by side, tie a knot and carefully trim the anchor cord ONLY! Leave the working cord in place.
- Thread the working cord over and up into the 2nd bead of Row 1 and then over and down into the 3rd bead of the same row.
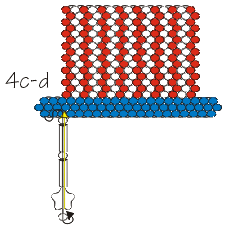
- From the 3rd bead of Row 1, string a Crystal seed bead, a bugle bead, another seed bead, a bugle, a 6mm Star, and another seed bead (be sure to go into the top point of the Star so that it hangs correctly). Now pull the cord back up into the Star and work back up to Row 1. Pull the dangle tight. Notice the seed bead at the very end (by the Star) holds everything in place.
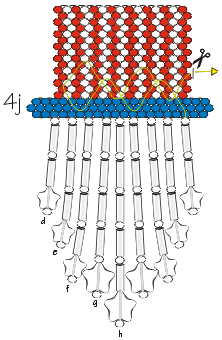
- String the cord up into Row 1, again into the 3rd Saph. bead and up into Row 2, then across and down into the 5th bead of Row 1. From here, string 3 Seed beads & 3 bugles (every other one is a seed bead) a 6mm Star, and another seed bead. Again, bypassing the end seed bead, string back up and into Row 1- the 5th bead.
- Again thread up, over and down into the 7th bead and string 4 seed beads and 4 bugles (every other a seed bead), 6mm Star, and a seed bead. String back up into the 7th bead and get over into the 9th bead of Row 1.
- From the 9th bead, again string 4 seed beads and 4 bugles but this time an 8mm Star, and then a seed. Go back up into the 9th Saph. and directly over and out of the 10th. This is the center of the project.
- Now string 5 seeds and 5 bugles, an 8mm Star, and another seed. String back up and go into the 11th bead of Row 1.
- Continue with the opposite side of the project making 4 more dangles to match the first side. Dangles should be out of Row 1, Saph. beads # 12, 14, 16, and 18. The first one is an 8mm Star and the remaining 3 are 6mm.
- Finish off the Hat by zig zagging the working cord up and throughout many different rows of the hat. Be sure to go up and down until it feels secure and will not pull out. Trim the cord when done.
- Making the Necklace:
- Using the remaining cord, string the needle. Starting somewhere in the center of the hat, again zigzag throughout a few rows of the hat to secure the working cord. Be sure to leave as little cord as possible at the end.
Work the cord up and through the very first bead on either side of Row 18.
Trim first end of cord- NOT the working cord.
NOTE: This is how cord is added to a project if necessary, and how a project is finished off. - String approx. 1¾" of Siam beads, one Crystal seed bead, an 8mm Star (be sure to go up through the bottom of the star), and another Crystal seed bead.
- Again string approx. 1½" of the Siam, a Crystal, a 6mm Star, a Crystal, 3 Siam, a Crystal, a 6mm Star, a Crystal, 3 more Siam, a Crystal, 6mm Star, and another Crystal.
- Now attach approx. 1½" of the Siam, a Crystal, an 8mm Star, a Crystal, and approx. 7" of Siam beads.
- This is the very back of the necklace. String a Crystal, 8mm Star, a Crystal, 3 Siams, a Crystal, 8mm Star (this time going through the point first- all the stars on the remaining side will be point first), and another Crystal.
- Continue down the remaining side of the necklace; following steps 5 until necklace is complete. String down into the 1st bead of the opposite end of Row 18 and down into the 1st bead of Row 17. Pull over, into the second bead of Row 17 and back up into the second bead of Row 18. Now start back up the necklace with the Saph. colored beads.
- String back up the remaining side of the necklace using the Saph. seed beads. Follow the exact pattern from the above but add approx. ¼" more beads and twist beads around the Siam as each section is made. Be sure to pull the cord into the Crystal seed bead, Star, and Crystal of each grouping.
NOTE: To help the cord stay twisted, tie a knot between each Crystal seed bead and the Stars, before and after each group. A small knot will stay hidden between the two beads and keep twisted. Also, be sure to twist in the same direction every time. - String only 3 beads right next to the 3 Siam, when stringing next to the group from step 5c. and at the very end of the necklace- Step 5e. They should be side by side (not twisted).
- Finish the necklace by pulling the cord down into the second bead of the top row of the opposite end and then zigzag throughout the Hat to secure. Trim cord.



Instructions by Angela Womach
Illustrated by Pat Eggers
© Rings & Things
Return/Go to Main Project Page
Designer Tip Sheets