4th of July Celebration Set (Matching Earrings) - Project Sheet #68-002-38
Parts: |
||
| 20-228-258 | Japanese Seed Beads, 11/0 - Siam Silverline | |
| 20-228-478 | Japanese Seed Beads, 11/0 - Dk. Sapphire SL | |
| 20-228-048 | Japanese Seed Beads, 11/0 - Crystal SL | |
| 16 | 20-303-042 | 7mm Glass Bugle Beads - Crystal |
| 8 | 23-666-042 | 6mm Glass Star Beads - Crystal |
| 2 | 23-668-042 | 8mm Glass Star Beads - Crystal |
| 80" | 61-119 | Nymo Cord - White |
| 1 | 65-030-12 | Needle, size 12 "Sharp" |
| 1pr. | 34-223-1 | Surgical Stainless Steel Ear Wires - White |
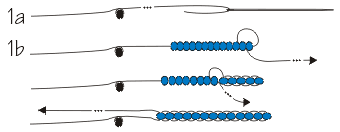
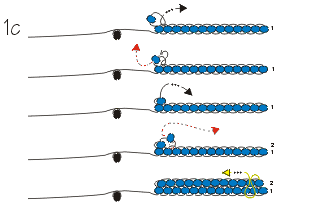
Note: These instructions assume that you already made the 4th of July necklace. If you didn't, then please refer to page 1 of the necklace instructions (or the Uncle Sam earrings) for more details on steps 1 and 2. Or, if you have made other brick stitch projects, you will probably be fine without the extra instructions.
Instructions: |
- Making the Brim:
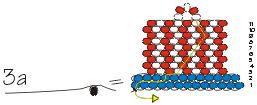
- Cut the cord in half and anchor a bead.
- Use the same "Ladder Stitch" from the above directions for Row 1, but string only 13 Saph. seed beads. Again keep the anchor bead on the bottom left hand side of the earring.
- Working up, use a normal "Brick Stitch" for Row 2 with 12 Saph. bead. Pull the working cord over and down into the second beads of Row 2 and Row 1. Now going back towards the left, string into the 3rd bead of Row 1 and up back into the 2nd bead of Row 2.
- Making the Crown:
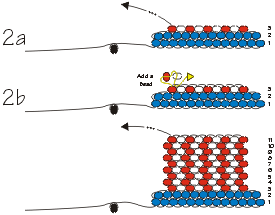
- Start Row 3 with 9 beads – alternate Siam and Crystal, starting with a Siam. Again use the normal "Brick Stitch", starting between the 2nd & 3rd bead of Row 2.
- Continue with Row 4 through Row 11, "adding" a Siam bead at the beginning of each row. Each row should be Siam & Crystal beads, alternating.
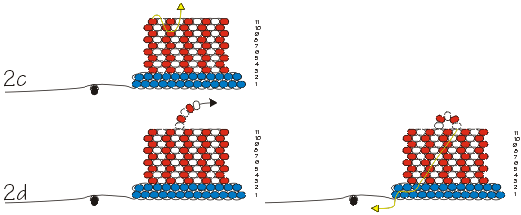
- The working cord should now be coming up out of the 1st bead of Row 11 on the left side. Pull the cord over and down into the 2nd bead and then down into the 3rd bead of Row 10. Continue to the right and go up into the 4th bead of that row and out the 4th bead of Row 11.
- String 5 beads, 3 Crystal & 2 Siam (every other one) for the loop on top of the hat. Pull cord down into the 6th bead of Row 11 and work the needle down to the very 1st row, the 1st bead with the anchor cord in it.
- Make the dangles:
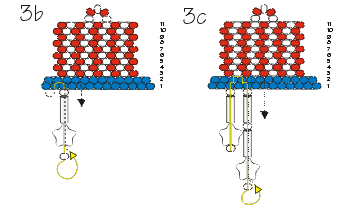
- With the 2 cords side by side coming out of the same bead, tie a knot and trim the anchor cord ONLY!!
- Pull the cord up and over into the 2nd bead of Row 1. Then string over and down into the 3rd bead.
String a Crystal seed bead, a Bugle, a 6mm Star (point first), and another seed bead. Like in the necklace, string back up into the same 3rd bead. - Continue up into Row 2, the 3rd bead and then over and down into the 4th bead; and again down into the 5th bead of Row 1. String a Crystal bead, bugle, Crystal, bugle, a 6mm Star, and a Crystal. Work back up into the 5th bead.
- The center dangle is located in the 7th bead of Row 1. To get there, string up into the 5th bead of Row 2, over and down into 6th bead and again down into the 7th bead of Row 1. String the exact pattern from Step 3d. but add a Crystal bead after the last bugle and instead of the 6mm Star, use an 8mm one.
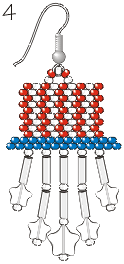
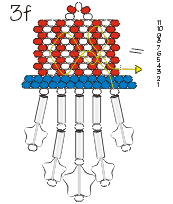
- The remaining 2 dangles are just like the first 2 (using 6mm Stars). They hang from the 9th and the 11th beads of Row 1.
- Pull cord back into the 11th bead and secure the earring by zig zagging up and around the project. When secure, trim cord.
- Attach the earwire.
Instructions by Angela Womach
Illustrated by Pat Eggers
© Rings & Things
Return/Go to Main Project Page
Designer Tip Sheets