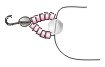
Lacy Seed Bead Choker — Project Sheet #68-002-42
Parts: |
||
| 2 | 61-249 | Size 2 Braided Nylon Needle End Cord |
| 2 | 41-264 | Fold-Over Bead Tips |
| 2 | 39-242 | Heart Lobster Clasp |
| 2 | 37-133 | Heavier Round Jump Rings |
| 3" | 40-414-1 | Heavy Curb Chain |
| 68 | Cast Flower Spacer Bead | |
| 2 | 27-572 | 2mm Metal Round Beads |
| 39 | 23-444 | 4mm Glass Firepolish Beads |
| 12 | 23-224-044 | 4mm Glass Round Beads - Matte |
| 1 | 23-368-044 | 8mm Diagonal Cube Bead - Crystal Matte |
| 2 | 20-128 |
Japanese Toho Seed Beads - 2 tubes, different colors (1 Main and 1 Accent Color) |
Instructions: |
||
- Knot the cording:
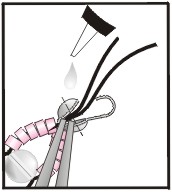
- Knot the (non-needle) ends of the cording together. Apply a drop of glue for extra security. Trim any extra cord from the end.
- String both cords into a fold-over bead tip. With the knot in the cupped area of the bead tip, gently close over the knot. This is a nice way to hide knots!
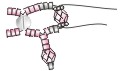
- Start design:
- String 5 seed beads on each cord. (Make this the choker's main color)
- On one cord, string a matte colored round bead.
- With the other cord, string back through the same matte bead, but go through the opposite bead hole. There should now be a cord coming through each end of that bead.
- Now string 6 more seed beads on each cord (main color).
- String another matte bead on one end and again take the other cord back through the opposite hole.
- Continue one more time with the above steps, using 6 seed beads and a matte bead, for a total of 3 groups. Pull groups snug but not overly tight. They should be slightly rounded.
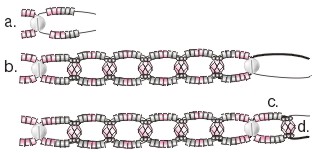
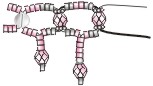
- Making the main design:
- After the last matte colored bead, string 3 of the main color seed bead and 3 of the other (accent color) seed bead. Do this on both strands.
- Now on one strand, string a metal flower spacer bead, a firepolish bead, and another flower spacer bead.
- Using the other strand, string cord back through the group of spacer, firepolish, spacer, so that there is a cord coming through each end.
- String 2 of the sccent, 2 main, and 2 more accents on each cord.
- Continue making 4 more of this same pattern with a spacer, firepolish, and spacer and then the group of seed beads from step 3d. This is the main design in the necklace.
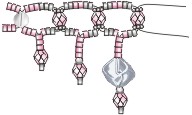
- After the 5th firepolish group, string 3 accent color seed beads and then 3 main colored.
- Now string a matte bead instead of the firepolish. No spacer beads!
- Repeat the above pattern.
- Start with 3 main colored seed beads and then 3 accent colored beads, on both sides.
- Continue with steps 3b. - 3g, for a total of 5 firepolish groups and 1 matte group.
- String 3 main seed beads and 3 accent beads on both top & bottom.
- On one strand, string a metal flower spacer bead, a firepolish bead, and another flower spacer bead. Using the other strand, string cord back through the group of spacer, firepolish, spacer, so that there is a cord coming through each end.
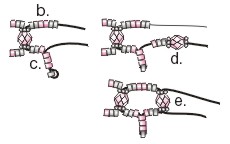
- Start the fringe:
- Now determine what will be top and bottom of the project. (It hasn't mattered before this point.)
- String 2 accent, 2 main, and 2 more accent beads on the TOP cord.
- On the BOTTOM cord, string 2 accent, 4 main, and 1 accent. Push to the end of the cord and then string cord back up through the first 3 main seed beads. This will leave the bottom accent as an anchor bead, starting the bottom fringe.
- Keep stringing on the bottom cord: a main seed bead, 2 accents, a spacer, firepolish, and a spacer.
- Pull the TOP cord through the spacer, firepolish, and spacer.
- Continue with steps 5b. - 5e three more times for a total of 5 firepolish groups.
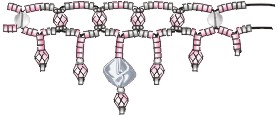
- After the 5th firepolish group, string 3 accent and 3 main beads on the TOP cord.
- On the BOTTOM, string 2 accent beads, 4 main, 1 accent—anchor by going up through the first 3 main ones and then string 3 more main and a matte colored bead. String so that there is a cord on the top & on the bottom.
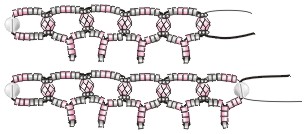
- Make center piece:
- On the TOP cord, string 3 main & 3 accents.
- The BOTTOM cord needs 6 main, a firepolish, and an accent. Pull cord back up into the firepolish and the first 3 seed beads.
- String 1 main & 2 accents, a spacer, firepolish, and another spacer. Pull top cord through the firepolish/flower grouping, so there is a cord on top & bottom.
- Start again on the TOP with 2 accents, 2 main, & 2 accents. String the BOTTOM with 2 accents, 5 main, one 2mm metal, a firepolish, and an accent. Anchor cord back up through the firepolish and the first 4 accents. Continue with a main, 2 accents, a spacer, a firepolish, and a spacer. Pull cord through.
- String 2 accents, 2 main, and 2 accents on the TOP cord. The BOTTOM has 2 accents, 5 main, the large matte cube, a 2mm metal, firepolish, and an accent. Anchor the cord, go up into the firepolish, cube, and 4 seed beads. Pull snug and continue with a main, and 2 accents, making a cord on top & on bottom.
- Continue the other half of the necklace. Follow the same pattern. Be careful to match pattern and not to pull too snug.
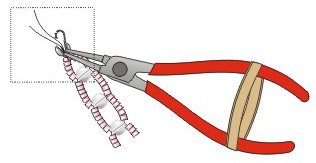
- Finish necklace with 5 main colored seed beads—5 on top cord, and 5 on the bottom cord. String the remaining bead tip on both cords, pull quite snug. Grasp both cords directly inside the bead tip using pliers. Wrap ends of pliers with a rubber band to hold secure and tie a knot right on top of the pliers. Apply glue to the knot and trim excess cord. Loosen rubber band and let knot slip into cups. Close over knot.
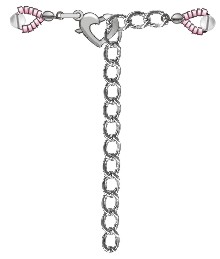
- Use a jump ring to attach the clasp to one side of the necklace.
On the opposite end, attach the chain directly to the bead tip.


Illustrated by Lauren Lind
© Rings & Things,
Return/Go to Main Project Page
Designer Tip Sheets