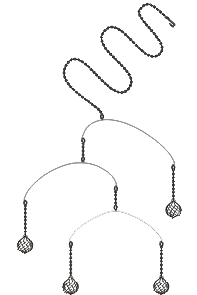
Rainbow Crystal Mobile — Project Sheet #68-002-44
Parts: |
|
| 18" of approximately 20 gauge wire (such as #47-038 or #47-048) |
|
| 28" of Cable Chain (such as #40-099-16-4 (by the spool) or #40-090-16 (by the foot)) | |
| Four Medium Tri-Bails (#37-036) | |
| Four Rainbow Crystals of your choice (all 4 must be the same so their weight will balance). | |
| A Hook Clasp (such as #39-293) | |
| 10 Large Jump Rings | |
Tools: |
|
| Round Nose Pliers | |
| Wire Cutters | |
- Cut wire and chain pieces.
- Cut the wire into three 6" pieces.
- Cut two 8-link pieces of chain (approximately 1"). Be sure these two pieces have an even number of links.
- Cut four 1.5" pieces of chain.
- The remaining 18-20" piece of chain is for hanging the mobile.
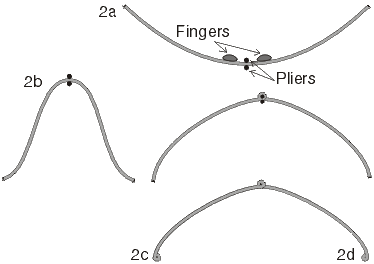
- Form the bottom wire arc:
- Using a pair of round nose pliers, approximately 8mm from the top of the pliers, grasp the center of one 6" piece of wire. The wire should be "smiling" at you.
- Hold firmly, and with one finger on each side, push wire around pliers until a loop forms. Loop sould be on the top of the wire with each end facing down. (It should now be frowning.)
- Grasp one end of the wire approximately 6mm from the top of the pliers and form a loop. Roll around pliers so that loop is on the bottom.
- Repeat step d on other end of wire arc.
- Apply steps 2a through 2d to the second 6" piece of wire, but instead of making the top loop in the middle, make it about 1/3 of the way from one edge. This will be the middle arc.
- Apply steps 2a through 2d to the second 6" piece of wire, but instead of making the top loop in the middle, make it about 1/4 of the way from one edge. This will be the top arc.
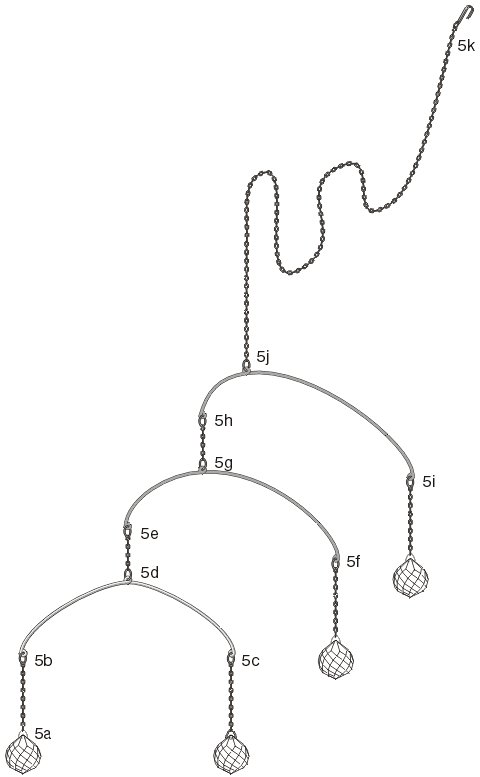
- Put the pieces together:
- Using a tri-bail, attach a crystal to one end of a 1.5" piece of chain. Close tri-bail carefully (using fingers, not pliers) to avoid chipping crystals. Repeat with the other crystals and 1.5" pieces of chain.
- Using a large jump ring, attach the other end of one of the 1.5" pieces of chain to a bottom loop of the bottom arc.
** Note: See Jump Ring Hint at end. ** - Using another large jump ring, attach the next 1.5" piece of chain to the other bottom loop of this arc.
- Use a jump ring to attach an 8-link piece of chain to the top of this arc.
- Use a jump ring to attach the top end of this 8-link chain to the bottom loop on the shorter side of the middle (1/3) arc.
- Use a jump ring to attach a 1.5" piece of chain (with a crystal at the bottom) to the other end of this middle arc.
- Use a jump ring to attach the top end of this arc to an 8-link piece of chain.
- Use a jump ring to attach the top end of this 8-link chain to the bottom loop on the shorter side of the top (1/4) arc.
- Use a jump ring to attach a 1.5" piece of chain (with a crystal at the bottom) to the other end of this top arc.
- Use a jump ring to attach one end of the long (18 - 20") chain to the top loop of the top arc.
- Use the last jump ring to attach the hook clasp to the far end of the long chain.
- Hang in a sunny spot!

 Note: Illustrations below this point are shown 50% actual size.
Other Possibilities:
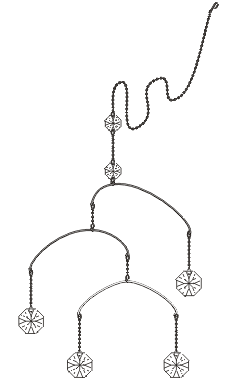
- Embellish the hanging chain with beads or 2-hole crystals.
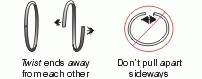
Jump Ring Hint:
When you open and close jump rings, twist sideways instead of "ovalling" them. This keeps their shape better, which makes them easier to close all the way.© Rings & Things,
Return/Go to Main Project Page
Designer Tip Sheets