Meteor Bracelet — Project Sheet #68-002-49
Printable Version (Requires Adobe Acrobat)
For a similar project in full color, see: Forget-me-knot Fairy Ring" (a printable PDF)
Parts: |
|||
| 110" | #61-571 | Chinese knotting cord (about 10 meters) |
|
| 1 spool | #61-310 | Silk bead cord (you'll use about 1/2 of a 200-yard spool) | |
| various | 3mm or 4mm round gemstone or glass Beads | ||
| various |
Center-drilled gemstone or glass star beads, bead caps or chips work well for the end/top beads for each meteor strand. |
||
Instructions:
- Cut cord into the following pieces:
One 40" piece — it will become the stationary center strands labeled "B"
One 70" piece, folded in half — it will become strands "A" and "C" - Anchor the project.
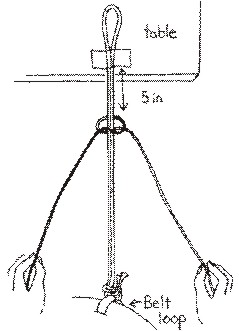
Macramé projects often utilize tape or a clipboard to hold the work in place, but I found that the loop of my belt worked very well. Just don't run to answer the phone before untying yourself! - Fold the 40" piece in half; tie the loose ends to your belt loop, and tape the other (looped end) to a table directly in front of you. (My craft table had a knob on it, which was perfect.)
- Fold the 70" piece in half and tie it to strand B, about 5 inches down from the place you anchored your B strands. See diagram.
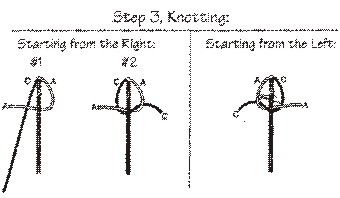
- Knotting
This bracelet uses one basic knot: the half-knot. This is how you will attach the A and C strands to the B strands. The B strands do not actually do anything yet, just keep them pulled tight. - Start with cord A and bring behind cords B, forming a loop with the A cord (about the size of a 50 cent piece) out to the right side.
- Now bring cord C behind the long length of A (now on the left side) and over cords B. Pull through the loop of cord A.
- Pull somewhat tight; the tighter the cord is pulled, the smaller the knot will be. Find the desired size and, for consistency, pull at that tightness throughout the whole project.
- Repeat step 3, but start on the left side instead of the right.
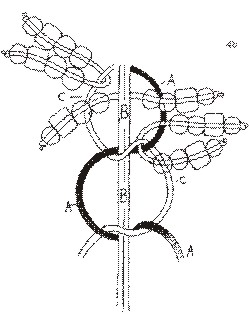
- Threading
Cut 60 to 100 separate lengths of bead cord about 5 inches long and able to fit through all of your beads. These will be the meteor strands. We used silk cord in a color that complemented the Chinese knotting cord. - On a 5" string, thread beads so that the pattern is the same on each end with a space in the middle, and a knot at each end. The end result should be about 1.5 inches long after the ends have been tied.
- Go back to step 3b, but before you pull each knot tight, lay your beaded strands inside the loops of the A and C strands. You can also lay an additional strand behind B, but above A and C. The more meteor strands you tuck in this way, the bigger and brighter your bracelet will be! Then pull the loops tight.
- Go to step 3d, and lay more meteor strands inside the loops before pulling tight. Repeat this process until you have completed a 5.5" (140mm) beaded bracelet section.
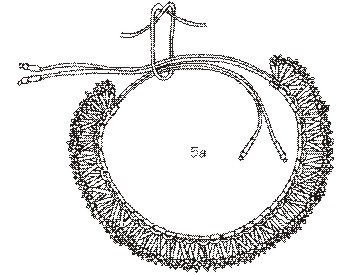
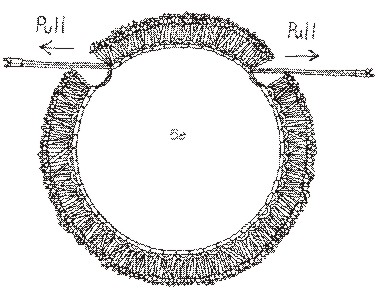
Don't cut anything yet! - Make the sliding clasp of the bracelet.
- Untie the bracelet from your belt loop and the table. Cut strands B, leaving 5 inches on each end of the bracelet, embellishing the ends with beads if you desire.
- Now begin the sliding clasp by folding the B strands over one another. Continue step 3 again, making half-knots and adding meteor strands before pulling tight. Only now you have four stationary "B" strands instead of two.
- Continue on for about two inches.
- To finish, cut the ends of the last half-knot, and secure the ends with glue, or carefully melt them.
- When the ends of the B strands are pulled, the bracelet will tighten, allowing it to slide on and off the wrist easily.
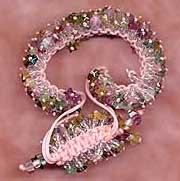
Whew! You have just completed a meteor bracelet!
Designer: Ondriyla
© Rings & Things, 2007-
Return/Go to Main Project Page
Designer Tip Sheets