Resin Bead Projects and Ideas — Project Sheet #68-002-39
|
| Seed Bead Embellished Resin "Eye" Bead |
Parts: |

|
Instructions: |
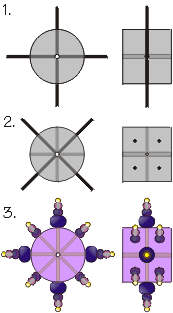
- Drill 4 holes, centered and evenly spaced around the diameter of the bead, to the center of the bead.
- Drill 4 pairs of holes (8 total) evenly spaced between the original holes, all to the center of the bead.
- Add Beads:
- Put an amethyst seed bead, cobalt seed bead, and an ‘E' bead on a head pin. Trim head pin to approx. 12mm total length (so it fits almost to the bead's center hole). Test to make sure it is the right length before applying glue to head pin. Apply a small amount of glue. Insert this head pin in one of the first 4 holes you drilled.
- Repeat 3 times. If necessary wait for glue to dry, and sand off excess glue.
Adjust amount of glue if necessary when you continue to the next step. - Put an amethyst seed bead and a cobalt ghost seed bead on the 8 remaining head pins. Trim each head pin to approx. 10mm. Test each before gluing.
Glue these into the remaining 8 holes. - Wait a few minutes, then test all the head pins to make sure they are securely glued in. If any come out... glue them in again!

Crystal-Embellished Resin Bead - Embellished Resin Oval - Heat-Treating (Faux Amber) Resin Beads - Rubber-stamped Resin Beads
© Rings & Things
Return/Go to Main Project Page
Designer Tip Sheets