Fat Tuesday Bracelet Tutorial
Created by: Tiffany White
Designer Tips
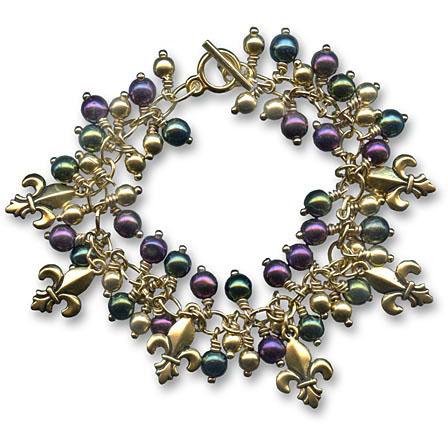
- Assemble all glass, brass and pearl beads on head pins. (Use round glass beads or Swarovski crystal beads, or both.) Secure with wrapped loops.
- Attach all charms to round brass jump rings.
- Attach charms and bead dangles to bracelet one at a time using oval jump rings:
Place two brass dangles on an oval jump ring.
On the next jump ring place one of each color glass dangles.
On the next link, place one brass dangle and one fleur-de-lis charm.
Repeat pattern until complete. - Finish with toggle clasp.
Free Technique Sheets & How-Tos
- For step-by-step instructions on making wrapped loops, and securely opening and closing jump rings, see:Basic Jewelry-Making Technique Sheet (PDF)

Suggested Supplies
- 1 pkg of 100 [use 25] #26-818-05 Bead, Brass, Round, 5mm
- 1 pkg of 100 [use 15] #23-226-363 Bead, Glass, Round, 6mm, Iridescent Green -or-
1 pkg of 100 [use 15] #05-810-06-238ST Swarovski 5810 Round Pearl Beads, 6mm - Iridescent Green - 1 pkg of 100 [use 15] #05-810-06-239ST Swarovski 5810 Round Pearl Beads, 6mm - Iridescent Purple
- 1 pkg of 10 [use 6] #49-947-19-AG Charm, Cast, Fleur-de-lis
- 1 gross [use 1] #39-190-09-4 Clasp, Toggle, Cast, 9.5mm
- 1 pkg of 100 [use 55] #37-099-15-4 Head Pin, 1.5", Standard, Ball End
- 1 oz [use 32] #37-147-2 Jump Ring, Oval, 5x7mm
- 1 oz [use 6] #37-133-0 Jump Ring, Round, Heavy, 4.5mm
Tools
- Chain-Nose Pliers
- Side Cutter
- Round-Nose Pliers
- The original bracelet photographed here was created with dyed freshwater pearls in purple and green. However, after receiving to many bad batches of dyed freshwater pearls, we've switched more towards the reliable quality and consistent colors of Swarovski crystal pearls. Oh great, and now Swarovski has stopped selling to the DIY industry, so we've switched to Preciosa pearls (which are also lovely and consistent in quality).
Jan 1st 2021
Our Bead Blog
-
Simply Springy 2-Hole Bracelet
Apr 28th 2025Designed by: Guest Designer Deb Floros Suggested Supplies 1 #61-840-50-01 Beadalon Cord, WildFire,
-
Exotic Statement Necklace
Apr 28th 2025Designed by: Guest Designer Deb Floros Suggested Supplies 1 #88-400-003-5 58x50mm Pewter Connector,
-
Rubber Tubing Necklace and Memory Wire Bracelet Set
Mar 21st 2025Designed by: Guest Designer Deb Floros Suggested Supplies 1 #61-622-02 2mm Rubber Cord, Bulk, for J


