Flying the Nest - Nest Bracelet Tutorial
Created by: Kayla Hefling
Designer Tips
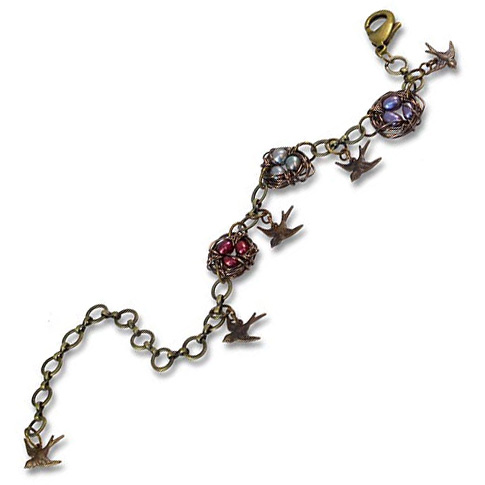
- Create the bird nests. For step by step instructions with images, see the How To Make A Wire Bird Nest blog post.
- Use 22-26 gauge wire depending on the hole size of the beads you choose for the "bird eggs".
- This style of wire-wrapped birds nest "baskets" work great for bracelets, earrings and pendants, because they don't have a closed-off back. You can see the bird eggs from both sides of the charm.
- Use jump rings to connect bird charms and nests to chain segments.
- To close the bracelet, connect the lobster clasp to one of the links on the chain. This allows the bracelet to fit multiple wrist sizes.
Free Technique Sheets & How-Tos

Suggested Supplies
- 1 ounce [use 12] #37-167-6 Antiqued Brass Plated Jump Ring, Round, 8mm
- 1 ounce [use 8] #37-133-6 Antiqued Brass Plated Jump Ring, Round, Heavy, 4.5mm
- 1 dozen [use 1] #39-343-6 Antiqued Brass Plated Lobster Clasp, 12mm
- 1 spool [use 10"] #40-099-37-6 Antiqued Brass Plated Ring/Connector Chain, Footage, 9mm
- 1 each [use three 32" pieces] #46-404-30 Artistic Wire®, 24ga, 45ft
- 3 pair [use 5] #88-103-05-0 Vintaj Natural Brass Charm, Bird, 17x17mm
- The original rice pearl beads used in this project are no longer available. However, Swarovski now makes sweet crystal rice pearls in great colors! We've linked a few of our favorites in to replace the original rice pearls used in this bracelet.
Tools
- #69-291 Tool, Set, Zebra Stripe, Six-Piece Set
Jan 1st 2021
Our Bead Blog
-
Simply Springy 2-Hole Bracelet
Apr 28th 2025Designed by: Guest Designer Deb Floros Suggested Supplies 1 #61-840-50-01 Beadalon Cord, WildFire,
-
Exotic Statement Necklace
Apr 28th 2025Designed by: Guest Designer Deb Floros Suggested Supplies 1 #88-400-003-5 58x50mm Pewter Connector,
-
Rubber Tubing Necklace and Memory Wire Bracelet Set
Mar 21st 2025Designed by: Guest Designer Deb Floros Suggested Supplies 1 #61-622-02 2mm Rubber Cord, Bulk, for J


