Together Cause Bracelet Tutorial
Created by: Rita Hutchinson
Designer Tips
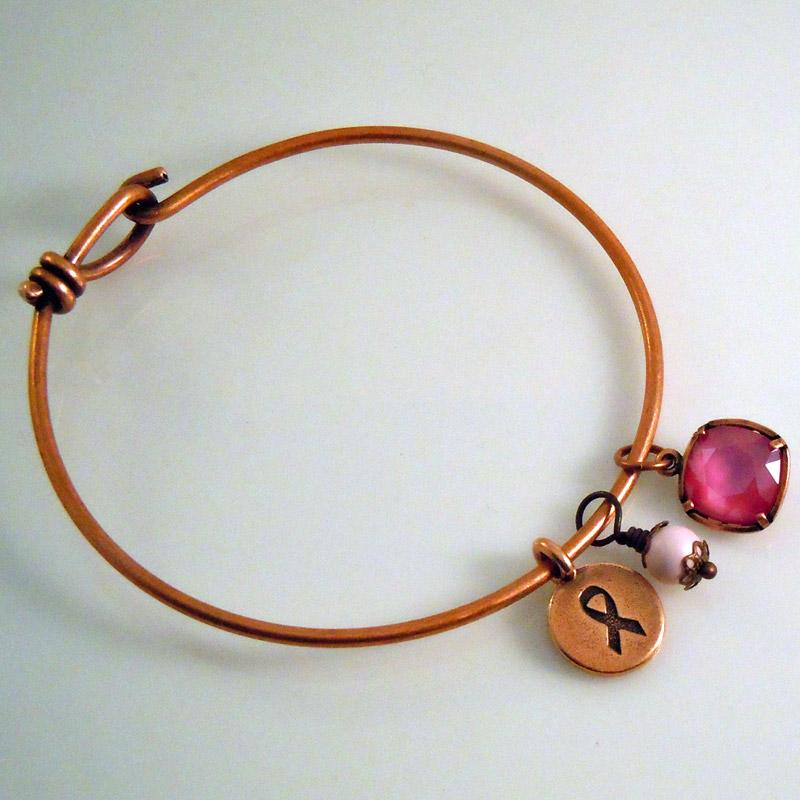
- String a bead cap, pastel pink pearl bead, and another bead cap onto the ball-end head pin and make a large wire-wrapped loop. Make the loop large enough, so that you don't need an extra jump ring to attach it to the bracelet.
- For step-by-step looping instructions, and the best way to open and close loops, see Jewelry Basics 101 (PDF).
- Place the crystal stone into the setting, and use nylon-jaw pliers to gently press the prongs down onto the stone. Go around all prongs a 2nd or 3rd time, pressing more firmly, to make sure all prongs are firmly in place. Add a jump ring to top of charm.
- Open bracelet, and slide charms on in desired order.
Because most Swarovski crystals will no longer be available by mid-2021, we've added some alternate pretty pale pink beads in place of the 6mm pastel rose pearl bead originally used in this project.

Suggested Supplies
- 1 each #51-710-7 TierraCast Wire Bracelet with Clasp - Antiqued Copper
- 1 each #49-958-64-AC TierraCast Antiqued Copper Plated Ribbon Charm
- 1 each #04-470-10-448 Swarovski 4470 Cushion Square Stone, 10mm - Crystal Peony Pink Lacquer
- 1 each #41-878-52-10-7 Antiqued Copper Plated 1-Loop Bezel Setting for 10mm 4470 Cushion Squares
- 1 gross (use 2 pieces) #43-110-7 Antiqued Copper Plated Bead Caps, Small, Filigree
- 1 100 (use 1 piece) #37-091-20-7 Antiqued Copper Plated Ball End Head Pin, Thin, 2"
- 1 oz (use 1 piece) #37-100-7 Antiqued Copper Plated Jump Ring, Round, Assorted Sizes
- 1 100 (use 1 piece) #05-810-06-283ST Swarovski 5810 Round Pearl Beads, 6mm - Pastel Rose
or - 6mm rose quarts, Peruvian pink opal, "fused" glass, or other 6mm gemstone or glass bead.
Tools
- Bent Chain-Nose Jewelry Making Pliers
- Chain-Nose Jewelry Making Pliers
- Round-Nose Jewelry Making Pliers
- Nylon-Jaw Flat-Nose Pliers
Aug 31st 2021
Our Bead Blog
-
Simply Springy 2-Hole Bracelet
Apr 28th 2025Designed by: Guest Designer Deb Floros Suggested Supplies 1 #61-840-50-01 Beadalon Cord, WildFire,
-
Exotic Statement Necklace
Apr 28th 2025Designed by: Guest Designer Deb Floros Suggested Supplies 1 #88-400-003-5 58x50mm Pewter Connector,
-
Rubber Tubing Necklace and Memory Wire Bracelet Set
Mar 21st 2025Designed by: Guest Designer Deb Floros Suggested Supplies 1 #61-622-02 2mm Rubber Cord, Bulk, for J


