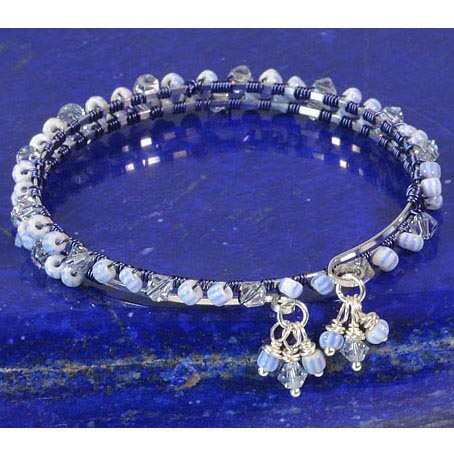
Blue Pin Stripe Lashed Memory Wire Bracelet Tutorial

This project uses durable, springy memory wire as the base, and 26-gauge dark blue Artistic Wire as an accent.
Created by: Amy Mickelson
Designer Tips
- Use heavy-duty cutters to cut memory wire.
- Lashing the beads onto the memory from the center outward allows you to keep half of the wire needed on the spool, making the wire wrapping easier to manage.
- You will need a total of 72-84" to wrap the beads onto the wire.
- Unroll approximately 36-42" wire from spool but do not cut it. Put the cover back on spool. Optional: Cut the full amount off the spool, and wind one-half of the amount onto a bobbin (#63-130-01).
- Start in the center of the bracelet, with the end of the wire closest to the spool, wrap the wire around one side of the bracelet wire 4 times.
- Add a crystal bicone and tightly wrap the wire around the bracelet 4 times. Add one striped trade bead and wrap 4 more times and add another trade bead.
- Repeat the process till you are about 1" from the end of the bracelet, wrap wire 4-5 times to secure and cut the excess wire.
- Now unroll another 36-42" of wire and cut it from the spool. Repeat the process in the other direction.
- Use memory wire bending pliers to create loops on each end of the memory wire, and embellish with wrapped loop dangles. For step-by-step instructions on making wrapped loop dangles, see Jewelry Basics Technique Sheet (PDF).
Free Technique Sheets & How-Tos
Suggested Supplies
- 1 pkg of 100 [use 6] #37-091-20-3 Head Pin, 2", Thin, Ball End
- 1 ounce [use 2] #37-133-3 Jump Ring, Round, Heavy, 4.5mm
- 1 each [use 72-84"] #46-406-00-12 Artistic Wire®, 26ga, Assortment Pack (use Dark Blue)
- 1 pkg [use 2-3 loops] #61-370-01-3 Memory Wire, Lg Flat, Bracelet, Silver Plated
- 2 dozen #05-328-04-88 Crystal, Bead, Faceted Bicone, 4mm, Light Sapphire AB
- or -
2 dozen #05-328-04-SC Swarovski 5328 Faceted XILION Bicone Beads, 4mm - Satin - 1 strand [use 46] #22-430-04 Trade Bead, E Bead, Striped, White/ Blue (no longer available -- try a Toho Seed Bead Cocktail (mix), or basic E beads)
Tools
- #69-271-99 Tool, Glitter, Four-Piece Set
- #65-507 Tool, Heavy-Duty Cutter, 5.5"
- #65-701 Tool, Memory Wire Bending Pliers
Dec 1st 2021
Our Bead Blog
-

Simply Springy 2-Hole Bracelet
Apr 28th 2025Designed by: Guest Designer Deb Floros Suggested Supplies 1 #61-840-50-01 Beadalon Cord, WildFire,
-

Exotic Statement Necklace
Apr 28th 2025Designed by: Guest Designer Deb Floros Suggested Supplies 1 #88-400-003-5 58x50mm Pewter Connector,
-

Rubber Tubing Necklace and Memory Wire Bracelet Set
Mar 21st 2025Designed by: Guest Designer Deb Floros Suggested Supplies 1 #61-622-02 2mm Rubber Cord, Bulk, for J