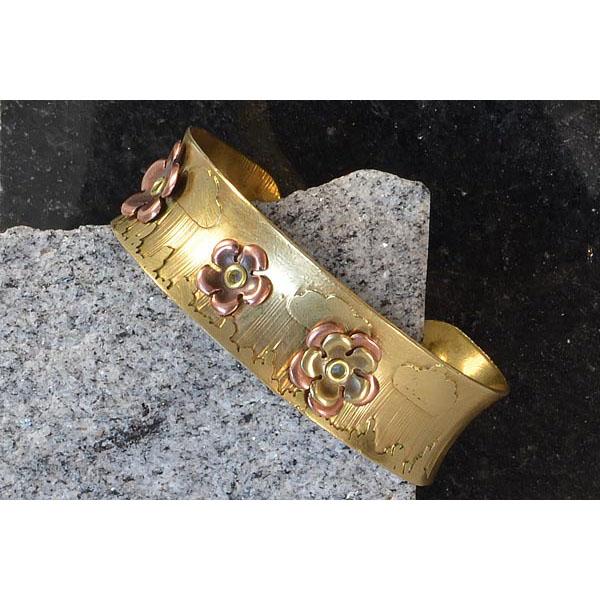
Cities in Bloom Bracelet Tutorial

Created by: Polly Nobbs-LaRue
Designer Tips
- Use a permanent marker to draw a few clouds in the sky, and tufts of grass on the ground. (After etching, I thought my tufts of grass looked more like a cityscape, so you may want to use an extra-fine-point Sharpie® for some of the grass.) The lines that look like rain were not drawn; they are simply a result of the ferric chloride etching process.
- Carefully and thoroughly mask the edges and back of the bracelet with masking tape, duct tape or Sharpie, to avoid rough spots on the edges of the bracelet.
- Float the bracelet in a plastic container of etchant (ferric chloride) for approximately 1 hour. To ensure an even etch, use a plastic tool or plastic gloves to wiggle the bracelet or turn it around approximately every 20 minutes.
- See the Copper Etching Blog Tutorial for more detailed etching instructions.
- Rinse bracelet and scrub thoroughly with baking soda (use a brass brush or an old toothbrush).
- File and/or sand any rough edges.
- Add any colorant desired at this point such as or Win-Ox™.
- Allow to dry, then seal the bracelet with Renaissance® wax.
- Choose spots for the flowers (or other rivet accents with a 3/32" center hole), and use a Sharpie to mark center dot for each. If the flowers fit oddly due to the concave shape of the bracelet, re-shape them with ring bending pliers. Just one firm "squish" down the middle of the flower should work perfectly. Don't rotate the flower and re-squish, because the bracelet is only concave in one direction.
- Punch 3/32" holes with the cutting end of the Crafted Findings tool.
- Try a few of the shortest eyelets to see which fits best (most likely: 1/18").
- Replace default 3/32" rivet setting end of Crafted Findings tool, with 3/32" eyelet flaring set, and use eyelets to secure the flowers.
Suggested Supplies
- 1 each #51-751-075-0 Bracelet Finding, Cuff, Concave, 3/4"
- 1 pkg of 120 [use 2] #69-952-01-2 Eyelet, 3/32", Assorted
- 1 each #86-280-01 Ferric Chloride
- 1 each #86-915 Renaissance® Micro-Crystalline Wax Polish
Tools
- #69-322 Plier, Nylon Ring-Bending Pliers
- #83-101 Sharpie®, Extra Fine Point
- #69-994 Tool, 3/32" Rivet Piercing/ Setting
- #69-908 Tool, 3/32" Eyelet Flaring Set
- #69-116 Tool, Brass Brush
- #69-257 Tool, Sanding Sponges, Set
- Apron
- Baking soda
- Duct tape
- Eye protection
- Fine-point black or red Sharpie or other permanent marker
- Plastic containers/tubs for etching solution
- Misc rivet accents with 3/32" holes (I used two 2mm flowers and two 14mm flowers). If the hole in your items is smaller, you can punch the hole larger using the 3/32" punch. And of course, you can turn nearly any sterling silver, copper, or brass item into a rivetable by punching a 3/32" hole into them.
Apr 30th 2021
Our Bead Blog
-

Simply Springy 2-Hole Bracelet
Apr 28th 2025Designed by: Guest Designer Deb Floros Suggested Supplies 1 #61-840-50-01 Beadalon Cord, WildFire,
-

Exotic Statement Necklace
Apr 28th 2025Designed by: Guest Designer Deb Floros Suggested Supplies 1 #88-400-003-5 58x50mm Pewter Connector,
-

Rubber Tubing Necklace and Memory Wire Bracelet Set
Mar 21st 2025Designed by: Guest Designer Deb Floros Suggested Supplies 1 #61-622-02 2mm Rubber Cord, Bulk, for J