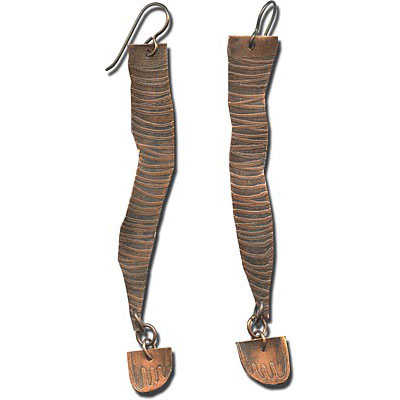
Lady-Leg Etched Earrings Tutorial

These fun etched copper earrings were cut out with shears (a jeweler's saw would also work great) and then the resist was hand-drawn with Sharpie, in the patterns of toes and thigh-high stockings.
Created by: Noryan Baker & Mollie Valente
Designer Tips
- Cut the metal into the desired shapes and file edges smooth.
- Apply the design wth a permanent marking pen (such as a Sharpie®). The metal covered with permanent ink does not etch.
- Punch holes in metal as pictured and patina.
- Use jump rings to connect the pieces. Add the ear wires.
Free Technique Sheets & How-Tos
Suggested Supplies
- 1 ea #86-280-01 Ferric Chloride
- 1 pair #34-063-41 French Hook Ear Wire, Niobium
- 1 oz [use 4] #37-136-7 Jump Ring, Round, 5mm
- 1 oz [use 2] #37-145-7 Jump Ring, Round, 6mm
- 1 ea [use 1.5x3.5" piece] #64-980-24 Sheet, 24 Gauge, 6x6"
- 1 ea #86-343 Win-Ox™, 3 oz.
Tools
- #69-275-53 Tool, Baby Wubbers™, Chain-Nose Pliers
- #69-275-58 Tool, Baby Wubbers™, Flat-Nose Pliers
- #69-234 Tool, EuroPunch Pliers, Round, 1.25mm Hole
- #69-252-01-4 Tool, Flat File, 6", #4 Cut
- #69-230 Tool, Shear, 7"
- Apron
- Baking soda
- Duct tape
- Goggles
- Rubber gloves
- Styrofoam™ "float" (available from craft supplier or upcycled packing material)
- Two plastic containers
- Extra fine-point Sharpie
Jan 1st 2021
Our Bead Blog
-

Simply Springy 2-Hole Bracelet
Apr 28th 2025Designed by: Guest Designer Deb Floros Suggested Supplies 1 #61-840-50-01 Beadalon Cord, WildFire,
-

Exotic Statement Necklace
Apr 28th 2025Designed by: Guest Designer Deb Floros Suggested Supplies 1 #88-400-003-5 58x50mm Pewter Connector,
-

Rubber Tubing Necklace and Memory Wire Bracelet Set
Mar 21st 2025Designed by: Guest Designer Deb Floros Suggested Supplies 1 #61-622-02 2mm Rubber Cord, Bulk, for J