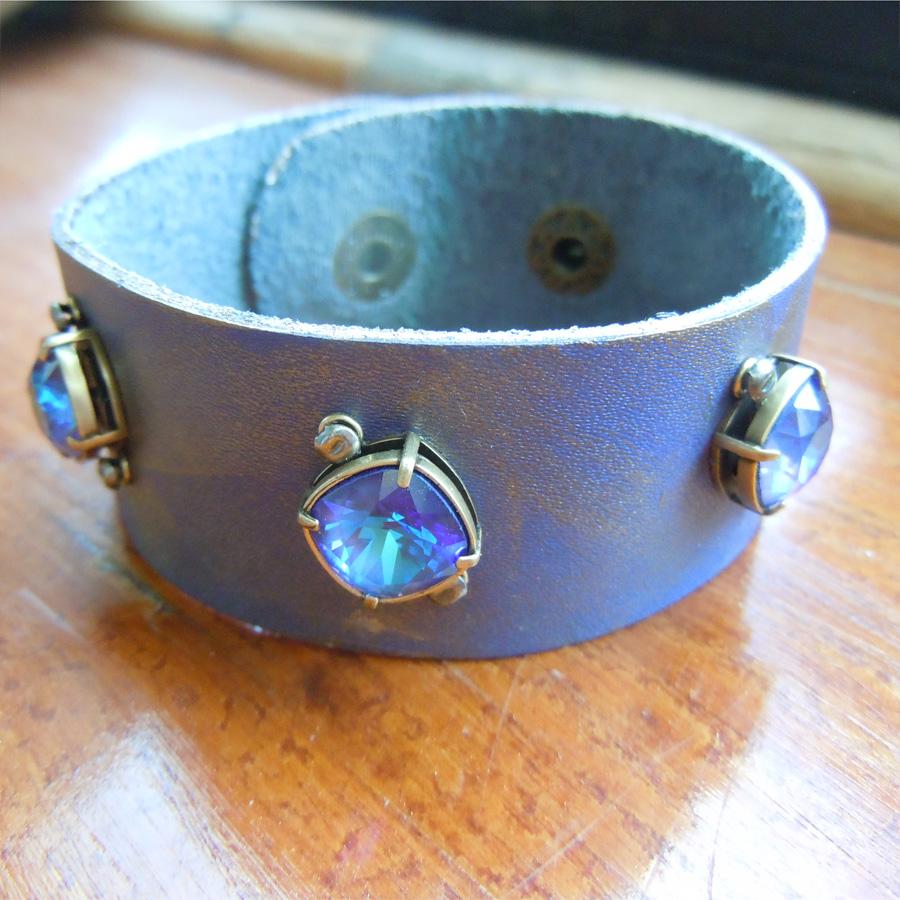
Sandra Leather Bracelet Tutorial
Created by: Rita Hutchinson
Designer Tips
- Squeeze out a few drops of patina (or your favorite metallic acrylic paint) on the craft sheet. Apply patina to the edges of the cuff, and then dry-brush patina sparingly to the surface of the bracelet.
- Let Patina dry.
- Set crystal stones in settings with nylon jaw pliers. (Smooth down further with burnishing tool or back end of Sharpie as needed).
- Determine placement of crystal settings, and press awl through the holes in the setting to mark hole locations. On scrap cardboard, pierce awl through the leather and enlarge hole to fit fasteners.
- Add crystals with fasteners, spreading the "legs" in opposite directions. Press legs flat against the back of the bracelet with flat nose pliers.

Suggested Supplies
10mm #4470 Cushion Squares by Swarovski are nearly gone, but these settings also work with most other brands of 10mm cushion squares. Shop remaining colors while they last!
- 1 each #51-810-10-25 Leather Cuff Bracelet, 1" - Purple
- 3 each #04-470-10-508 Swarovski 4470 Cushion Square Stone, 10mm - Ultra AB Purple
- 3 each #41-878-56-10-6 Pendant Bezel Setting for 10mm Cushion Stone, 2 Loops - Antiqued Brass Plated
- 1 pkg [use 6 pieces] #55-000-63 Tim Holtz ideaology, Mini Fasteners
- 1 each #86-422-051 Ranger Patina, Vintaj - Aged Bronze (or your favorite metallic acrylic paint)
Tools
- #86-930 Ranger Artist Brush Set - 7 pieces
- #69-271-91 EURO TOOL Glitter, Nylon Jaw, Flat-Nose Jewelry Pliers
- #69-389 Ranger Non-Stock Craft Sheet
- #69-275-31 Wubbers Flat-Nose Pliers
- #65-801 Kemper Metal Awl
- Scrap cardboard
Feb 1st 2021
Our Bead Blog
-
Simply Springy 2-Hole Bracelet
Apr 28th 2025Designed by: Guest Designer Deb Floros Suggested Supplies 1 #61-840-50-01 Beadalon Cord, WildFire,
-
Exotic Statement Necklace
Apr 28th 2025Designed by: Guest Designer Deb Floros Suggested Supplies 1 #88-400-003-5 58x50mm Pewter Connector,
-
Rubber Tubing Necklace and Memory Wire Bracelet Set
Mar 21st 2025Designed by: Guest Designer Deb Floros Suggested Supplies 1 #61-622-02 2mm Rubber Cord, Bulk, for J


