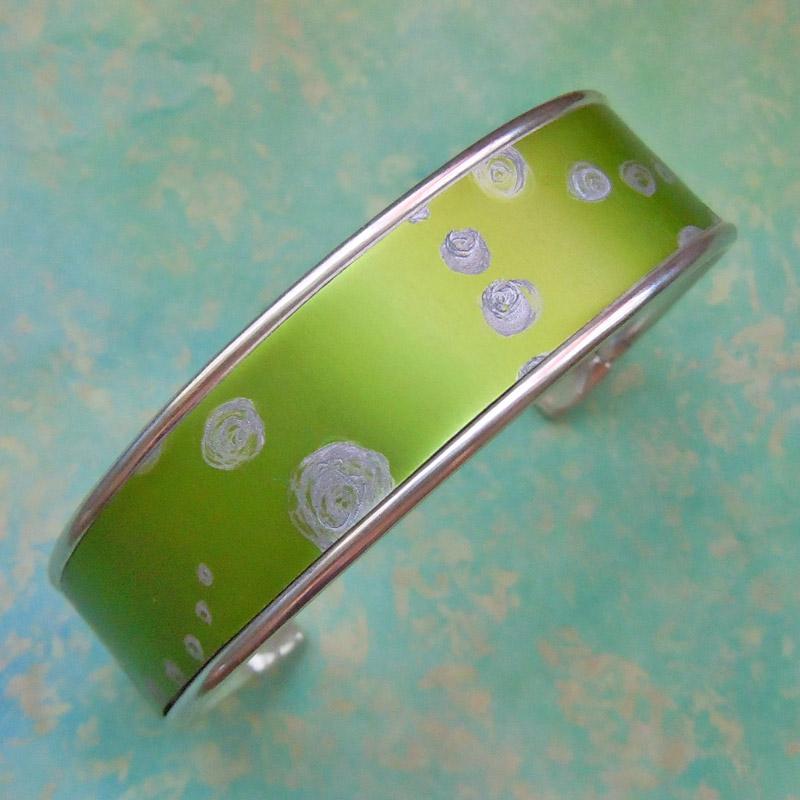
Sweet and Sour Engraved Bracelet Tutorial
Edged cuff bracelets also work great for leather, fabric, beaded designs and more!
Created by: Rita Hutchinson
Designer Tips
- Stamp or sketch design on aluminum sheet if desired.
- Follow marked (or freehand) design with engraver.
- Remove excess ink if needed.
- Cut sheet to the width of the bracelet channel.
- File edges as needed.
- Form aluminum to general cuff shape with EZ bender tool.
- Using flat nose pliers, gently open the overlapped end portion of the bracelet.
- Test the fit of the aluminum to the bracelet base, slipping ends into the overlapped end sections. If needed, trim extra from ends of aluminum piece.
- Apply adhesive to half of the bracelet base and adhere first side of the aluminum. Allow to dry.
- Carefully apply remainder of the aluminum strip to the rest of the bracelet base with superglue. If needed, binder clips can help hold the parts in the proper shape while curing.
- Squeeze overlapping end section back into place to complete bracelet.

Suggested Supplies
- 1 each #51-756-075-3 Cuff Bracelet with Edges, 3/4" - Silver Plated
- 1 each #64-910-24-18 Anodized Aluminum Sheet, 24 Gauge, 6x6" - Sour Apple
- 1 each #60-244 Adhesive, Loctite Ultra Gel Control SuperGlue
Tools
- #69-275-31 Tool, Wubbers™, Medium, Flat-Nose Pliers
- #69-633 EURO TOOL ProShear
- #69-603 The BeadSmith E-Z Bender Tool for Cuff Bracelets
- #69-198 Micro Engraver
- #69-252-01-2 EURO TOOL Flat File, 6", #2 Cut
Other Supplies (Optional)
- Rubber Stamp
- Stamp Pad
- Ink Remover
- Sharpie or other Marker
See all sizes and colors of Edged Cuff Bracelets and Aluminum Sheet.
Jan 1st 2022
Our Bead Blog
-
Simply Springy 2-Hole Bracelet
Apr 28th 2025Designed by: Guest Designer Deb Floros Suggested Supplies 1 #61-840-50-01 Beadalon Cord, WildFire,
-
Exotic Statement Necklace
Apr 28th 2025Designed by: Guest Designer Deb Floros Suggested Supplies 1 #88-400-003-5 58x50mm Pewter Connector,
-
Rubber Tubing Necklace and Memory Wire Bracelet Set
Mar 21st 2025Designed by: Guest Designer Deb Floros Suggested Supplies 1 #61-622-02 2mm Rubber Cord, Bulk, for J


