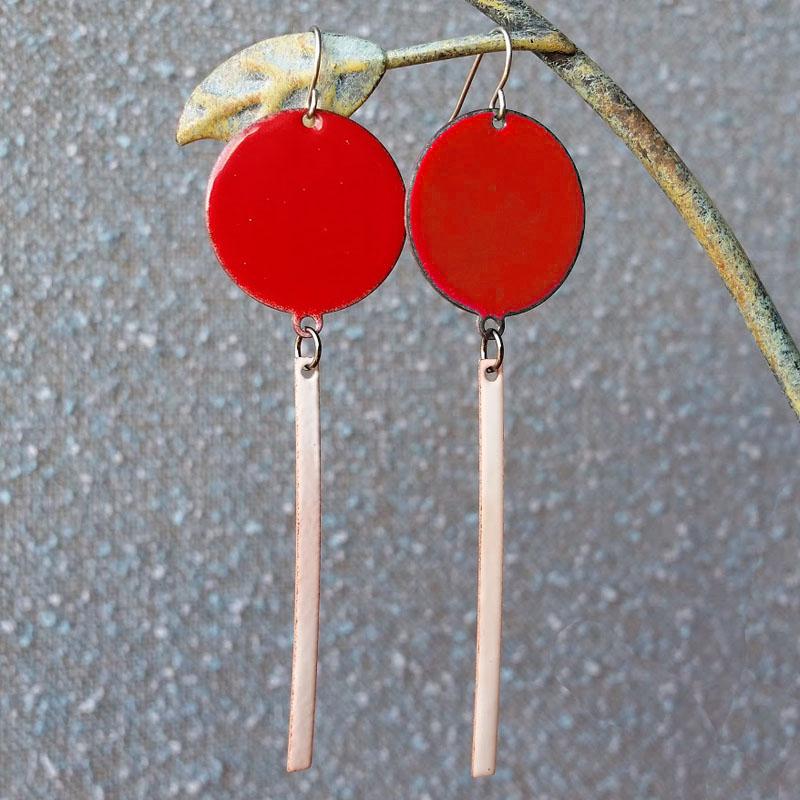
99 Luftballons Tutorial
ok, so maybe it's just 2 Red Balloons, not 99...
Created by: Summer Melaas and Polly Nobbs-LaRue
Designer Tips
- Punch a 1/16" hole in each blank, directly opposite the existing loop or hole.
- Clean the blanks with Penny Brite to remove all oils.
- Spray each blank lightly with Klyr Fire before sifting enamel evenly onto each blank: red on the balloons, and foundation white on the strips.
- Carefully transfer a blank to torching basket (in tripod, over a heat-resistant work surface), and torch fire. Strips may need to be torched on the mesh (allow to cool between batches).
- Begin heating from the back, and carefully move flame to the top, so you don't blow the enamel off.
- Watch closely: when the enamel begins to melt, you'll see a glossy "orange peel" stage where the enamel beads up before slumping to a smooth fired sheen. Fire a bit more, but don't overheat - some colors will scorch.
- Use fiber-grip tweezers to carefully grasp fired piece by edges (don't damage the fresh enamel). Set aside and allow to cool in a warm pan of vermiculite.
- After cooling, scrub firescale off back with Penny Brite.
- Use 5mm gunmetal jump rings to connect the enameled components. For instructions opening and closing jump rings and loops, see Jewelry Basics 101 (PDF)
- Open the loop on an ear wire and add to the top of the enameled disk.

Suggested Supplies
- 2 each #44-780-21 Copper Stamping Blank, Round with Loop, 30x26mm
- 1 dozen [use 2] #44-722-50-0 Brass Stamping Blank, Long Bar with Hole
- 1 ounce [use 2] #37-100-9 5mm gunmetal jump rings
- 1 gross (72 pair) [use 1 pair] #34-840-01-0 Titanium Earring Hook Findings, Plain
- 1 each #81-500-1880-02 Thompson Opaque 80-mesh Enamel for Metals - Flame Red, 2-oz.
81-500-1881-S (sample size) also available ... but you'll need the whole 2 oz for 99 Red Balloons! - 1 each #81-500-1030-02 Thompson Opaque 80-mesh Enamel for Metals - Foundation White, 2-oz.
- #86-220-07 Penny Brite Copper Cleaner
- #81-510-001 Klyr Fire, Holding Medium
Tools
- #69-235 EURO TOOL Metal Punch, Two Hole
- #69-650-S Small 80-Mesh Screen Sifter
- #65-153 Torching Basket for Enameling by Eugenia Chan
- #69-354-9 EURO TOOL Tripod with Mesh Screen, 9"
- Fire-Resistant Work Surface: #69-182 Fire Blocks, 12"x12" Ceramic Tiles and/or Cement Tile-Backer Board
- #69-613 Handy Flame II Propane/MAPP Torch - or -#69-620 Handy Flame Butane Torch
- (Both of these torches give you a larger flame than the butane micro torches. You need the larger flame for torch enamelling anything except tiny pieces. It's also great for annealing!)
- #69-428 EURO TOOL Fiber-Grip Cross-Locking Tweezer
- #69-275-02 Wubbers Round-Nose Jewelry Making Pliers
- Safety Gear: Dust Mask, Protective Eyewear and Nitrile Gloves
- Small spray bottle (cosmetics/travel aisle or craft store) for Klyr Fire
- Fuel Tank Holder: Large can 1/3 filled with rocks (coffee can size works well to secure fuel tank)
- Vermiculite in warm bread pan or small crockpot
For more information about enameling: see the Enamels & Enameling Supplies section of our website.
Jan 1st 2021
Our Bead Blog
-
Simply Springy 2-Hole Bracelet
Apr 28th 2025Designed by: Guest Designer Deb Floros Suggested Supplies 1 #61-840-50-01 Beadalon Cord, WildFire,
-
Exotic Statement Necklace
Apr 28th 2025Designed by: Guest Designer Deb Floros Suggested Supplies 1 #88-400-003-5 58x50mm Pewter Connector,
-
Rubber Tubing Necklace and Memory Wire Bracelet Set
Mar 21st 2025Designed by: Guest Designer Deb Floros Suggested Supplies 1 #61-622-02 2mm Rubber Cord, Bulk, for J


