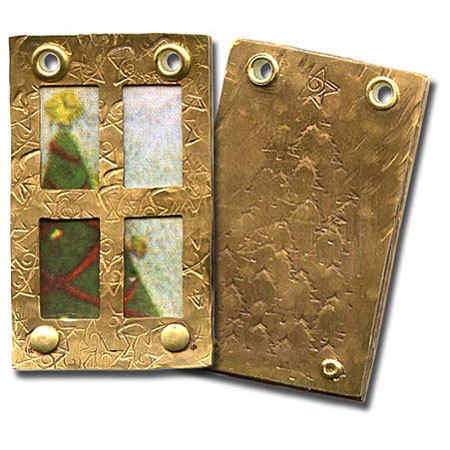
Christmas Tree Window Tutorial
Created by: Polly Nobbs LaRue
Designer Tips
- Clean the door blanks with fine-grit sandpaper and a polishing cloth, or in a tumbler for 2-3 hours.
- Find a pleasing portion of the Christmas tin, that fits in the window of the door blank. Draw around outside of door blank with fine-point permanent marker. Cut tin with shears at inside edge of line.
- Stamp stars randomly on the front door panel, and add texture as desired with the rounded end of a ballpeen hammer. Stamp or hammer a design or pattern on the back too.
- To make your pattern stand out, antique the brass pieces with Win-Ox. Dry thoroughly and polish as desired. Don't wait until the end to antique your design, as you don't know exactly what the "tin" is made of.
- Sandwich the tin between the 2 pieces of the door blank, align edges carefully, and hold bottom half in place with Ring Clamp. Wedge clamp firmly to hold tight.
- In one top corner, punch a 3/32" hole through all 3 pieces. Slide a 3/32" diameter x 3/32" long eyelet through this hole, and use the 3/32" eyelet flaring set to secure it. Repeat for other other top corner.
- For bottom corners, use 1/16" cutter and rivets.
- Q: Why use a mix of 3/32"-diameter eyelets, and 1/16"-diameter rivets?
- A - eyelets: The 3/32" eyelets are a much better eyelet size than the tiny 1/16" eyelets, because they are large enough to put a decent-sized jump ring or bail through, to hang your pendant.
- A - rivets: The 1/16" rivets... that's personal preference. I prefer the look of the 1/16" diameter rivets, but you can use either diameter.
- File and/or sand any rough edges if necessary.
- To use handmade wire rivets and tube eyelets instead of the Crafted Findings riveting system, see Riveting Techniques (PDF).
- Did you know, you can also use the Crafted Findings rivets and eyelets with traditional "hammer and block" riveting (and eyelet setting) techniques -- see the Riveting Techniques PDF for an overview, and this nifty riveting block designed by Eugenia Chan.

Suggested Supplies
- 1 pkg of 10 sets [use 1 set] #44-721-01 Blank, Rectangular Paned Window (Raw Brass)
- 1 pkg of 120 [use 2] #69-952-01-2 Eyelet, 3/32", Assorted (Brass)
[Use shortest size (3/32" long)] - 1 ea #86-915 Renaissance® Micro-Crystalline Wax Polish
- 1 pkg of 100 [use 2] #69-920-01-2 Rivet, 1/16", Sample Pack (Brass)
[Use second-shorted size (3/32" long)] - 1 ea #86-343 Win-Ox™, 3 oz.
Tools
- #63-549-RT Jewelry Care Cloth, 6x8", R&T Logo
- #69-257-000 Polishing Paper, Assortment, Wetordry™ (Assorted) [Optional]
- #69-355-08 Shinebrite™, for Tumbler, 8 oz.
- #69-900 Tool, 1/16"" Rivet Piercing/ Setting (Steel)
- #69-908 Tool, 3/32" Eyelet Flaring Set
- #69-904 Tool, 3/32" Piercing Set (Steel) or #69-235 Tool, Metal Punch, Two Hole
- #69-366 Tool, Economy Needle Files, 6pc
- #65-910 Tool, 12-Face Hammer with 6 Texture Faces (Use "stripe" side)
- #69-135 Tool, Hammer, Ballpeen, 4oz [Optional]
- #69-345 Tool, Hammer, Brass, 2lb [or basic utility hammer from your garage]
- #69-365 Tool, Ring Clamp
- #69-245-18 Tool, Stamp, Star with Spiral (Tempered Steel)
- #69-230 Tool, Shear, 7"
- #69-282 Tool, Stainless Shot, 2lb
- #69-125 Tool, Steel 4" Square Block
- #69-281 Tool, Tumbler, 3lb Capacity
- Decorative holiday theme cookie tin, popcorn tin, etc
- Sharpie®, Extra Fine Point (Black) [or other fine-point permanent marker]
Jan 1st 2021
Our Bead Blog
-
Simply Springy 2-Hole Bracelet
Apr 28th 2025Designed by: Guest Designer Deb Floros Suggested Supplies 1 #61-840-50-01 Beadalon Cord, WildFire,
-
Exotic Statement Necklace
Apr 28th 2025Designed by: Guest Designer Deb Floros Suggested Supplies 1 #88-400-003-5 58x50mm Pewter Connector,
-
Rubber Tubing Necklace and Memory Wire Bracelet Set
Mar 21st 2025Designed by: Guest Designer Deb Floros Suggested Supplies 1 #61-622-02 2mm Rubber Cord, Bulk, for J


