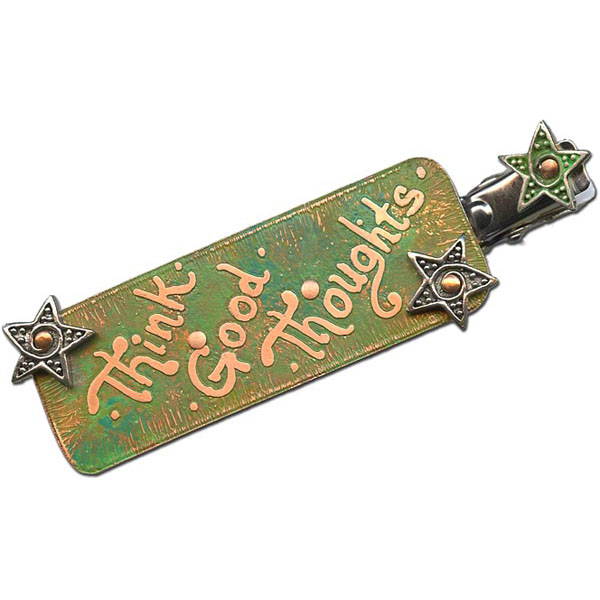
Good Thoughts Barrette Tutorial

Created by: Polly Nobbs-LaRue
Designer Tips
- The original alligator clip used for this barrette is no longer available, but our new French-style barrette backs are more secure (hold better in hair) and now have a good hole for riveting.
- A fine-point Sharpie is about the perfect minimum width for etched designs with ferric chloride.
- With the fine-point Sharpie, draw a line about 90mm from the end of the copper strip. (About 5mm or 1/4" longer than the barrette back). Sketch your rough design, keeping in mind the approximate location that the rivets will be. If your design requires a little more length, it's fine to make the barrette longer. (Use rubbing alcohol to wipe off design.)
- Draw matching curves on all 4 corners, then carefully cut out shape with shears. The cleaner you cut, the less filing you'll have to do. File corners and any rough edges.
- Use 400-grit sandpaper to scuff up the surface (so you have a good "toothy" surface for your Sharpie etching mask).
- Clean with Penny Brite and rinse well.
- Draw or write final design. Make sure all lines are clean and solid. Add extra dots if desired. They can echo the shape of the rivets in the finished design, plus help disguise any accidental dots that occasionally occur from bubbles that stick to your piece while it is etching.
- Don't make any dots for the rivets yet but keep in mind where the rivet holes will be, and consider where to place any (optional) stars or other embellishments you've selected. (Don't add any riveted accents to the middle 15mm or so, where the barrette back will be attached to the design.)
- When you're happy with the design, protect all 4 edges of the copper strip with Sharpie, and cover the back with Sharpie and/or duct tape. Attach to a "boat" of styrofoam and float it face-down in a container of ferric chloride. Time varies depending on temperature. Wiggle the float every 10 or 15 minutes to swish off random bubbles that attach to the front of your design. When it's done etching (30 minutes to 2 hours), clean thoroughly with baking soda, a brass brush, and running water. Allow to dry.
- Gently use bracelet bending pliers to match the curve of the French barrette back. Get it as close as you can, but it doesn't have to be perfect.
- Apply dots of color from the patina kit to selected spots of the design, and distribute color as desired with a paintbrush or a twist of paper towel. Allow to dry. (Wash paintbrush promptly!) Use a brass brush to remove excess color, then clean off high points with the first 2 grits of polishing papers (first 400, then 600).
- Jewelry Luster or Alcohol Inks, or you may be able to find a few last packs of Vintaj patina at your local craft store, or Jax green patina at a local stained glass shop.
- Place the curved copper blank face down on a soft work surface. Center the barrette back on it, and make a dot for your first rivet, through the appropriate hole in the barrette back.
- Punch 3/32" hole using hole-punching side of Crafted Findings riveting tool.
- The 3mm holes in the barrette back are slightly too large to securely hold a 3/32 rivet head, so you will need a couple of washers. My favorite versatile washer is a 6mm vinyl heishi trade bead (inexpensive, and available in a wide variety of colors and sizes). Punch a 3/32" hole in the center of a vinyl heishi bead. Repeat. (You'll need 2 of these.)
- Layer your components for riveting: Place one of the shorter rivets from your assortment, through the copper, then the barrette, and then add 1 heishi washer.
- Check the length - the rivet tail should stick out approximately 1mm (1/16") past the components. Much less, and the rivet won't hold. Much more, and the rivet won't look as clean. However, slightly too long is better than slightly too short.
- Set the rivet following the instructions with your Crafted Findings riveting tool.
- Push etched copper strip firmly down onto barrette and determine location for other hole to be punched. No need to mark a dot: Simply punch this hole, using the barrette's hole as your guide.
- Set this rivet exactly like before: run a short rivet through the copper, then the barrette, then a vinyl heishi washer.
- If any of your accents are charms, first snip the loops off with flush cutters, then file rough spots smooth.
- Determine spots for any riveted accents, mark their holes on the front of the etched design, and punch holes for the accents. As necessary, punch holes in your accents. No need for a washer for these, because all your holes are 3/32". Find appropriate length rivets from the mix, and set rivets.
- If you scuffed the rivet heads, give them a quick polish with 400 then 600-grit polishing papers.
- Follow the manufacturer's directions spray seal the piece to protect the patina. Light coats are best, or your patina will change appearance.
Suggested Supplies
- 1 pkg of 6 [use 1] #64-981-20-100 Sheet, 20 Gauge, 6x1"
- 1 pkg of 100 [use 5] #69-920-21 3/32"-Dia Rivet Sample Pack, Short, by Crafted Findings (your choice of metal colors)
- 1 each #30-554-80 80mm French Style White Steel Barrette Back
- 1 pkg #69-257-0000 Polishing Paper, Assortment, Wetordry™
- 1 each #86-220-07 - or - #86-221-07 Penny Brite® Copper Cleaner
- 1 each #86-280-01 Ferric Chloride
- 1 each #86-420-995 Patina Kit, Vintaj
- 1 each #82-525-12 EnviroTex® Spray Sealer, 12.5oz
Tools
- #69-230 Tool, Shear, 7"
- #69-252-01-2 Tool, Flat File, 6", #2 Cut
- #69-251-PL File Handle, Plastic
- #69-116 Tool, Brass Brush
- #69-994 Crafted Findings 3/32" Rivet Piercing/ Setting Tool
- #69-380 Tapered Flush-Cutter (Optional, for cutting loops off charms to use as embellishments)
- #69-306-P ImpressArt Jewelry Pliers, Bracelet Bending
- 3 flattish pewter, brass, copper or sterling star charms or beads, or other rivetable embellishments . (You can cut the loop off charms, or use a bead reamer to enlarge the holes in beads made of these soft metals.)
- Fine-point Sharpie® (from office supply store)
- Paintbrush or paper towel
- Isopropyl (rubbing) alcohol
Jan 1st 2021
Our Bead Blog
-

Simply Springy 2-Hole Bracelet
Apr 28th 2025Designed by: Guest Designer Deb Floros Suggested Supplies 1 #61-840-50-01 Beadalon Cord, WildFire,
-

Exotic Statement Necklace
Apr 28th 2025Designed by: Guest Designer Deb Floros Suggested Supplies 1 #88-400-003-5 58x50mm Pewter Connector,
-

Rubber Tubing Necklace and Memory Wire Bracelet Set
Mar 21st 2025Designed by: Guest Designer Deb Floros Suggested Supplies 1 #61-622-02 2mm Rubber Cord, Bulk, for J