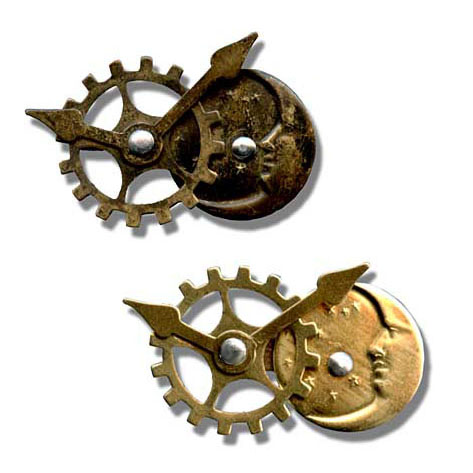
Goodnight Moon Pins Tutorial

Created by: Polly Nobbs-LaRue
Designer Tips
- Cut loops off the moon charms and file smooth.
- For one pin, antique the brass components and bar pin with Win-Ox™ before assembling. Allow the parts to dry. Polish with a soft cloth if desired.
- NOTE: It is not safe to use Win-Ox on aluminum, so this design must be antiqued before assembly, or not at all.
- Mark, punch and rivet the moon charm to the bar pin, following directions included with tool. Rivet the moon so it covers the bar pin's catch.
- We carry 3 qualities of bar pins: economy, good, and superior quality. The superior-quality bar pins have 1/16" holes, so are perfect for use with these 1/16" rivets.
- For more information on using this riveting system, check out this instructional video.
- Use one brass rivet accent behind the sprocket, to raise the sprocket charm over the moon charm.
Suggested Supplies
- 1 pkg of 50 [use 2] #38-303 Bar Pin, 1" (Nickel Silver) (not shown)
- 1 doz [use 2] #44-402-0 Charm, Moon & Stars, Solid, 20x17mm (Raw Brass)
- 1 doz [use 2] #44-311-0 Hour & Minute Hand, 12x27mm (Raw Brass)
- 1 pkg of 100 [use 4] #69-920-01-1 Rivet, 1/16", Sample Pack (Aluminum)
- 1 pkg of 16 [use 2] #69-930-01-2 Rivet Accent, Assorted (Brass)
- 1 doz [use 2] #44-303-0 Sprocket, 19mm (Raw Brass)
- 1 ea #86-343 Win-Ox™, 3 oz.
Tools
- #69-900 Tool, 1/16" Rivet Piercing/ Setting (Steel)
- #69-251-M Tool, File Handle, Medium
- #69-271-93 Tool, Glitter, Tungsten Cutter
- #69-250-04 Tool, Needle File, Half Round, 6.25", #2
Feb 22nd 2023
Our Bead Blog
-

Simply Springy 2-Hole Bracelet
Apr 28th 2025Designed by: Guest Designer Deb Floros Suggested Supplies 1 #61-840-50-01 Beadalon Cord, WildFire,
-

Exotic Statement Necklace
Apr 28th 2025Designed by: Guest Designer Deb Floros Suggested Supplies 1 #88-400-003-5 58x50mm Pewter Connector,
-

Rubber Tubing Necklace and Memory Wire Bracelet Set
Mar 21st 2025Designed by: Guest Designer Deb Floros Suggested Supplies 1 #61-622-02 2mm Rubber Cord, Bulk, for J