Illuminating Lotus Earrings Tutorial

Created by: Veronica Greenwood
Designer Tips
- Thoroughly clean your blank with Penny Brite. See our enameling blog article for tips, precautions and basic instructions for preparing the piece for enamel, and for torch firing enamels.
- Add scoops of desired colors of enamel into depressions in an artist's palette. Add a small amount of Klyr-Fire or distilled water (about 40% liquid to 60% enamel powder). Use the pretty cobalt bottle to add drops of water. It won't really mix like paints, but it will allow you to scoop / dab paintbrush blobs of wet enamel into your design. See Enameled Yellow Submarine for tips on painting with enamel.
- Important: Allow your piece to completely dry before firing, or the enamel will boil/volcano off.
- See "Pop of Color" for a good description of the torch firing process.
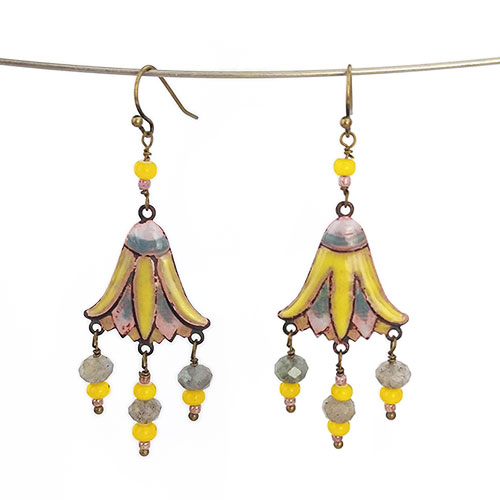
- When enameling on brass, your colors can be a bit less predictable than when enameling on copper (especially without a base layer of white). This pair ended up with a pretty (but not entirely expected) pink section at the edges of each enamel color. The marbled opaque beige/pink seed beads nicely pull everything together.
- After firing and cooling, create earrings:
- Because the gemstone beads are hand faceted, and the whiteheart beads are handmade, sort out matching pairs of beads before assembling earrings.
- On your head pin. slide on 1 seed bead, one yellow bead, 1 labradorite bead, 1 yellow bead and 1 seed bead. Wire wrap a loop directly onto the center bottom loop of your connector.
For step-by-step instructions on making wire-wrapped loops, see Jewelry Basics 101 (PDF). - On another head pin, slide on 1 seed bead, 1 yellow bead and 1 labradorite bead, and wire wrap to one of the outside bottom loops on your connector.
- Repeat for other bottom loop.
- Using a head pin with the end cut off (or a piece of 24-gauge wire), make a wrapped loop and attach to the top loop of your connector. Slide on 1 seed bead and 1 yellow bead and finish with a wrapped loop.
- Open the loop on your ear wire with a twisting motion and attach your enameled piece. Twist securely closed.
- Repeat for other earring.
Suggested Supplies
- 1 pair #88-104-08-0 Vintaj Natural Brass Connector, 20mm Lotus Blossom
- 1 strand (use 6 beads) #21-906-105 Labradorite Gemstone Beads, 6x4mm Faceted Rondelle
- 1 strand (use 10 beads) #22-110-09-04 Trade Beads, White Heart, 3-4mm
- 1 tube (use 10 beads) #20-111-1201 TOHO Glass Bead, Size 11 (2.1mm), Marbled Opaque Beige/ Pink
- 1 100-pack (use 8 pieces) #34-398-6>34-398-6 Antiqued Brass Plated Ball End Head Pin, Thin, 1.5"
- 1 pair #34-398-6>34-398-6 Antiqued Brass Plated French Hook Ball End Earwire - 2mm Ball
- 1 pack #81-500-1237-S Thompson Opaque 80-mesh Enamel for Metals - Butter Yellow, Sample
- 1 pack #81-500-1920-S Thompson Opaque 80-mesh Enamel for Metals - Stump Gray, Sample
- 1 pack #81-500-1905-S Thompson Opaque 80-mesh Enamel for Metals - Pastel Gray, Sample
- 1 bottle #81-510-001 Klyr Fire Holding Medium
Tools
- #86-220-07 Penny Brite Copper Cleaner
- #86-930 Ranger Artist Brush Set - 7 pieces
- #63-110-01-522 Boston Bottle with Dropper - 1 oz., Cobalt
- #61-153 Torching Basket for Enameling by Eugenia Chan
- #69-354-9 EURO TOOL Tripod with Mesh Screen, 9"
- #69-620 - Handy Flame Butane Torch
- #65-452 - Cross locking Tweezer
- Basic Jewelry-Making Tools (wire cutters, round-nose pliers, chain-nose pliers)
Jan 1st 2021
Our Bead Blog
-

Simply Springy 2-Hole Bracelet
Apr 28th 2025Designed by: Guest Designer Deb Floros Suggested Supplies 1 #61-840-50-01 Beadalon Cord, WildFire,
-

Exotic Statement Necklace
Apr 28th 2025Designed by: Guest Designer Deb Floros Suggested Supplies 1 #88-400-003-5 58x50mm Pewter Connector,
-

Rubber Tubing Necklace and Memory Wire Bracelet Set
Mar 21st 2025Designed by: Guest Designer Deb Floros Suggested Supplies 1 #61-622-02 2mm Rubber Cord, Bulk, for J