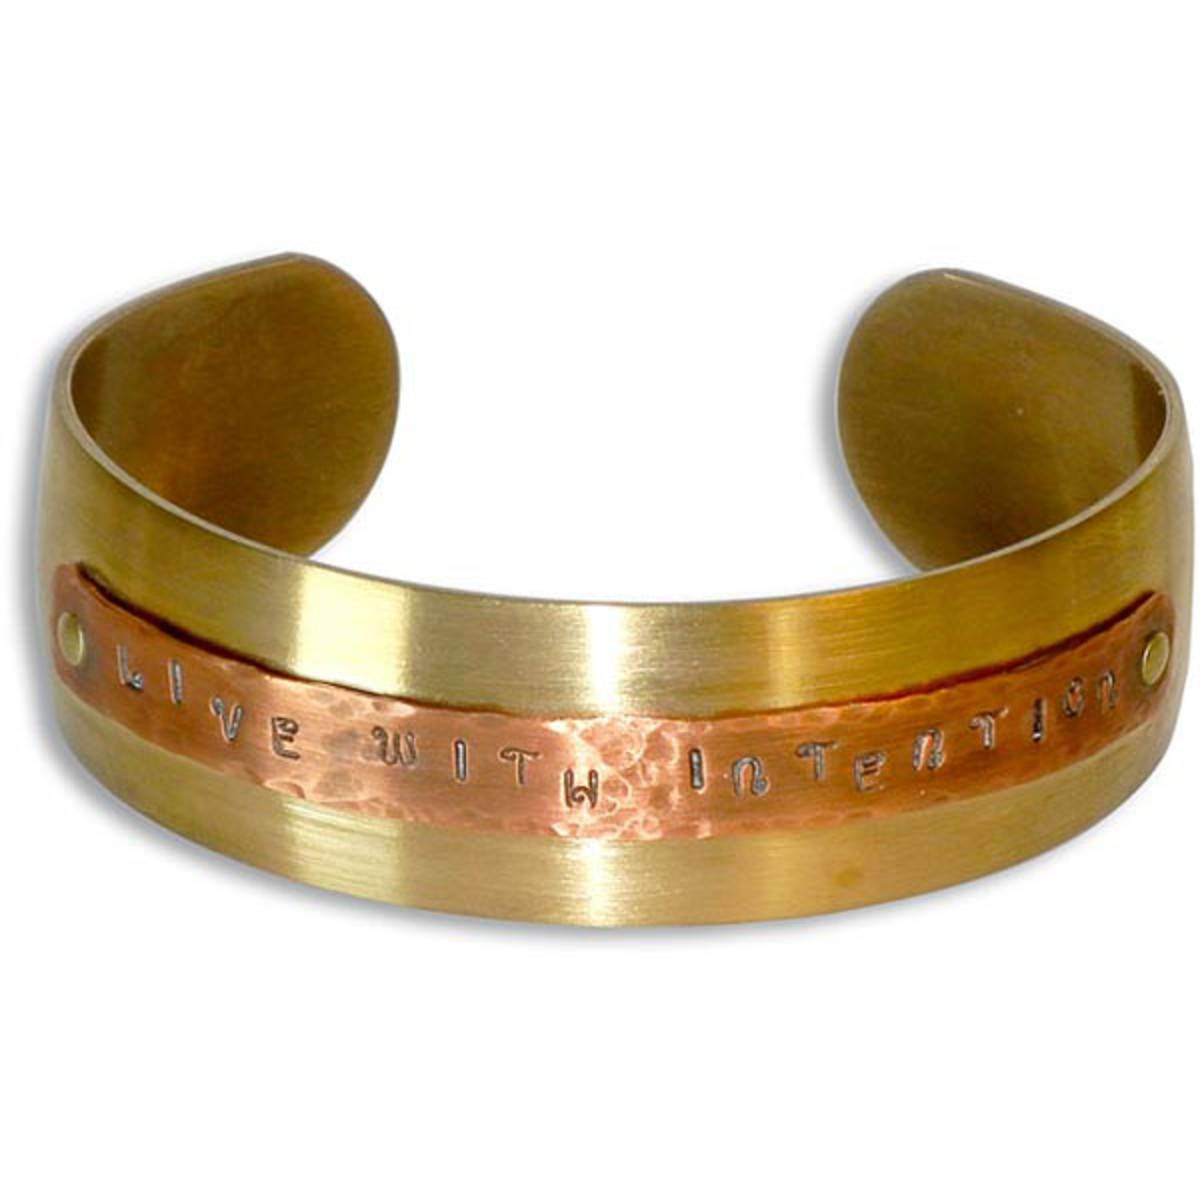
Live With Intention Cuff Tutorial
Created by: Polly Nobbs-LaRue
Designer Tips
- Stamp favorite quotes on inexpensive easy-to-use strips of precut copper, then rivet them to sturdy brass cuff bracelets. If you make a mistake when stamping on the copper strip, it's a much less expensive mistake than a mis-stamp on a specialty blank or bracelet.
- Stamp a phrase on the the 24-gauge copper bracelet strip. With metal shears, cut to length (keep approximately 6mm or 1/4" extra at each end for riveting) and gently round the corners. And textures of your choice with ballpeen, chasing or other jewelry hammer. File any rough edges.
- Oxidize the strip of copper, then clean with steel wool (or a flat green plastic dish scrubbie) for a light matte texture.
- With your fingers (or a bracelet mandrel) and a nylon hammer, shape the copper strip to fit the the curve of the bracelet. If you are making the bracelet to fit a particular person, first have them adjust the brass bracelet to fit their wrist.
- Polish the brass bracelet cuff as desired: steel wool for a matte finish, or tumble with steel shot (1-2 hours) for a mirror-bright finish.
- Using an extra-fine-point Sharpie permanent marking pen, mark spots for the rivet holes 2-3mm from each end of the copper strip.
- In the Crafted Findings tool, replace the default (flat) cutting base with a domed piercing base. This will prevent a divot or dent in the domed brass bracelet (and it works fine on the flat strip).
- Replace the default rivet setting set with the reverse rivet setting set. The allows you to keep the nice rivet head on the top of the bracelet.
- Punch both ends of the copper strip. Carefully center the copper piece on the bracelet, and mark, pierce and rivet one end of the bracelet.
- Make any final adjustments necessary to the shape of the copper strip (use a nylon hammer). Mark, pierce and rivet other end.
- Polish entire bracelet with steel wool or a soft polishing cloth, and seal with Renaissance® wax.
Suggested Supplies
- 1 ea #51-750-075-0 Bracelet Finding, Cuff, Domed, 3/4"
- 1 ea #86-915 Renaissance® Micro-Crystalline Wax Polish
- 1 pkg of 50 [use 2] #69-921-02-2 Rivet, 1/16", 3/32" Long
- 1 pkg of 6 [use 1] #64-981-24-25 Sheet, 24 Gauge, 6x0.25"
- 1 ea #86-343 Win-Ox™, 3 oz.
Tools
- #69-244-25 Tool, 1/12" Stamp Set, Uppercase Verona, 27pc
- #69-902 Tool, 1/16" Domed Piercing Base
- #69-915 Tool, 1/16" Reverse Rivet Flaring Set
- #69-900 Tool, 1/16" Rivet Piercing/ Setting
- #69-345 Tool, Hammer, Brass, 2lb
- #69-341 Tool, Hammer, Nylon
- #69-230 Tool, Shear, 7"
- #69-355-08 Shinebrite™, for Tumbler, 8 oz.
- #69-282 Tool, Stainless Shot, 2lb
- #69-281 Tool, Tumbler, 3lb Capacity
- #69-173 Tool, Wood Bracelet Mandrel
- 0000 fine steel wool (or a flat green kitchen scrubbie)
- Extra Fine Point Sharpie permanent marker
Jan 1st 2021
Our Bead Blog
-
Simply Springy 2-Hole Bracelet
Apr 28th 2025Designed by: Guest Designer Deb Floros Suggested Supplies 1 #61-840-50-01 Beadalon Cord, WildFire,
-
Exotic Statement Necklace
Apr 28th 2025Designed by: Guest Designer Deb Floros Suggested Supplies 1 #88-400-003-5 58x50mm Pewter Connector,
-
Rubber Tubing Necklace and Memory Wire Bracelet Set
Mar 21st 2025Designed by: Guest Designer Deb Floros Suggested Supplies 1 #61-622-02 2mm Rubber Cord, Bulk, for J


