Rings & Things Jewelry Blog
Celebrations Day of the Dead Tutorial
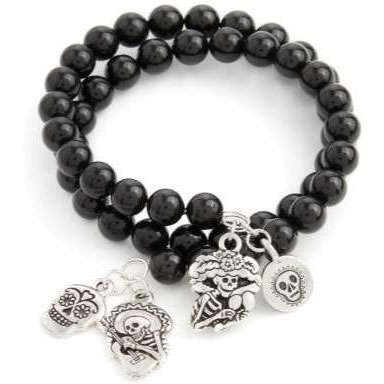
Celebrations Day of the Dead bracelet depicts the musical side of this holiday. The beautiful TierraCast musical charms nicely offset the Swarovski Crystal Mystic Black pearls.Created by: Swarovski's Create Your Style Design Team Designer TipsUsing memory wire bending pliers, roll back one end of the memory wire to create a closed loop.Slide 50 pearls onto the memory wire.Trim excess wire, keeping approximately 3/4" (19mm). Using memory wire bending pliers, roll back the end creating a clos
…
Nov 1st 2021
Flores de Muertos Bracelet Tutorial
Created by: Rita HutchinsonDesigner TipsUse 4 of each color crystal to create 28 wrapped loop crystal dangles.This finished length is 8.5". Use larger or smaller jump rings to adjust the length.Free Technique Sheets & How-TosBasic Jewelry-Making Technique Sheet (PDF)Suggested Supplies1 pkg of 10 [use 5] #44-940-59-AS Charm, Cast, Calavera1 dozen [use 1] #39-349-3 Clasp, Lobster, 15mm1 pkg of 10 #44-940-68-AS 18mm Bone Connector
…
Nov 1st 2021
Graveyard Sweater Guard Tutorial
Created by: Liz Graf Designer TipsMeasure the 3.9mm chain, and cut one 4" piece, and one 5" piece.Measure the 4.5mm chain, and cut a 6" piece.Attach the chains to the sweater guards with large jump rings from the jump ring size assortment. For most secure way to open and close loops, see Jump Ring Hint in Jewelry Basics 101 (PDF).Attach the charms to the chain with jump rings.Suggested Supplies1 dozen (use 2 pieces) #30-302-1 White Plated Sweater Guard Clips1 package (use 3
…
Oct 31st 2021
Fade To Black Skull Necklace Tutorial
Created by: Summer Melaas and Sondra BarringtonDesigner TipsFile the drop loops, to give the gluing surface more "tooth". See "Gluing to Metal" Technique Sheet below for additional gluing tips.Mix 2-part epoxy per manufacturer instructions.Glue one drop loop to top of 10mm black skull.Glue a drop loop onto top and bottom of the 14mm and 18mm skull. Allow glued items to dry.Use the non-tarnish silver wire, and wire-wrap links to connect the skulls with 4mm rondelles, in this order: 18mm skull - 4
…
Oct 31st 2021
Edwardian Lime Skull Bracelet Tutorial
Created by: Toni Plastino Designer TipsString beads in desired pattern, and tie a square knot or surgeon's knot (see technique sheet). Pull tight, trim most of the excess, and (if possible) tuck the knot into one edge of a skull bead.There are plenty of parts on each strand to make 2-3 bracelets. Well... there were, but the lime green beads the designer used, are no longer in production, as neon colors go in and out of style in the fashion world. We've linked in a few other green bead opt
…
Oct 31st 2021
Pumpkin Harvest Earrings Tutorial
Created by: Sondra BarringtonDesigner TipsUse a tapered flush-cutter to trim the loop off leaf charm to shorten stem. Create a new loop that is closer to the leaves of the charm.Create a small coil of 14-gauge copper wire to secure pumpkin bead (on the bottom). Wrap the top of the pumpkin, sliding the leaf charm onto the wire before making the top loop.Patina the copper wire, bead, and leaf charm and seal before assembling.Create 24-gauge wire coils and attach them by wrapping around base of pum
…
Oct 31st 2021
Pumpkin on the Vine Earrings Tutorial
Created by: Mollie ValenteDesigner TipsMake 2 matching spiral head pins. Follow the steps from the Rings & Things blog post "How to Make Spiral Head Pins.Add the following beads to a spiral head pin: 3mm fluted hogan bead, copper rondelle with fluted pattern, and 3mm fluted hogan bead.Form a simple loop to the top of the spiral head pin.Attach a French hook ear wire.Repeat steps to make the second earring.Suggested Supplies1 spool (use 6 - 8 inches) #47-205-20 Red Brass Jewelry Wire, 20ga, R
…
Oct 31st 2021
Trilogy of Treats with no Tricks - Earrings Tutorial
3 fun pairs of Halloween earrings created by: Swarovski's Create Your Style Design Team (slightly modified by Rings & Things to replace discontinued items.)Designer TipsFor the black cat earrings, add a 6mm briolette bead and 4mm tangerine bicone bead to an eye pin. Trim excess and make a loop. New to jewelry-making? See Jewelry Basics 101 (PDF).Using 1 pair of chain-nose pliers evenly across each loop, turn the top loop so it's 90-degrees (perpendicular) to the bottom loop. This will help t
…
Oct 31st 2021
Spiders and Skulls Jewelry Set Tutorial
Created by: Liz GrafDesigner Tips - For Necklace:String crystals, skull beads, and beads on beading cable. Finish each end with a crimp tube and wire protector.Attach spider charms with jump rings to the wire protectors on each side.New to jewelry-making?Find step-by-step instructions for finishing the ends of beading cable, and securely opening and closing jump rings, in Jewelry Basics 101 (PDF).Cut your chain into two 6" pieces (26 links each).Attach the chain sections to the beaded section us
…
Oct 31st 2021
Transylvanian Visitor Pin Tutorial
Created by: Rita HutchinsonDesigner TipsLaminate or seal the image with Crafter's Pick™ The Ultimate adhesive.Glue the image onto the blank "back" with the Crafter's Pick.Use side cutters to remove part of the "x" from the door blank. File until smooth, and then hammer for texture. Darken metal with Win-Ox™.Punch through both parts of door blank from the back to prevent deforming of metal when removing from tool.Attach the bar pin with E-6000.Free Technique Sheets & How-TosBasic Jewelry-Maki
…
Oct 31st 2021


