Rings & Things Jewelry Blog
Sweet Skull Pendant Tutorial
Created by: Rita HutchinsonDesigner TipsUsing ball-end head pins, make 8 beaded loop dangles in flowery colors. Use one metal rondelle on each side of the crystal bead for fuller dangles. Wrapped loops will add additional length.For step-by-step instructions for making beaded loop dangles, as well as the best way to open and close jump rings, see Jewelry Basics 101 (free download below).Use a small circle stamp, to stamp a pattern in the border of the round pewter blank. Fill center with sugar s
…
Oct 30th 2021
Sunny Day Skull Earrings Tutorial
Created by: Rita HutchinsonDesigner TipsCreate skull dangles and outer-circle Size 6 E bead dangles with headpins, corrugated beads, and seed beads.For step-by-step direction on making head pin loops, see Jewelry Basics 101 (PDF)Wrap wire around a 1-3/4" dowel or round form about 3 times. From this, cut 2 matching pieces of wire (each ring should overlap at the ends by about 1/2", in other words, be a bit more than 2"" long).Artistic Wire is soft. Hammer the ring of wire with the rawhide mallet
…
Oct 30th 2021
Spiral Skull Earrings Tutorial
Use memory wire to create your own ear wires!Created by: Rita HutchinsonDesigner TipsUse heavy-duty flush cutters to cut 2 equal lengths of memory wire.Form a loop at one end using sturdy round-nose pliers. New to making jewelry? See Jewelry Basics 101 (PDF).With flat-nose pliers, create a sharp bend at the "middle" of the wire.Smooth the opposite wire end with a cup bur.Form a spiral* (see below) with plated wire: Add the skull bead, complete the wrapped loop and attach to the ear wire.* To for
…
Oct 30th 2021
Swarovski Crystal Candy Corn Earrings Tutorial
Created by: The Swarovski Crystal design teamDesigner TipsCut wire into two equal pieces 18" long.Load onto one piece of wire: 13 Swarovski XILION Beads in Sunflower. Moving 6 beads off to one side, and keeping the 7 remaining beads in the center of the wire, take the wire exiting from the 6 beads and string the wire through all 7 beads. (Note: the wire tails should be exiting in opposite directions from the 7 beads. The 6 beads should be sitting on top of and in between the 7 Sunflower beads. I
…
Oct 30th 2021
Jewelry Design Gallery
Welcome to our new Jewelry Design Gallery! To browse jewelry ideas by category or theme, use the turquoise #tags below (#etched jewelry projects, #enamel projects, etc.) for all projects of a particular category. For a Jewelry Design Gallery / Resources search box, click here or press the turquoise "FREE JEWELRY PROJECTS" link near the bottom of any project's page. You might also like our blog (blog.rings-things.com), filled with step-by-step illustrated projects, and a spot for Q
…
Oct 28th 2021
Jump Ring Hint
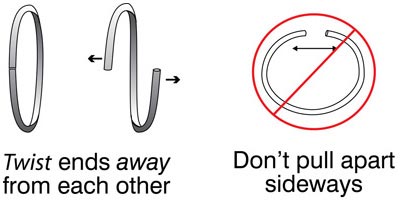
When you open and close jump rings, twist ends instead of "ovaling" them.This keeps their round shape better, which makes them easier to close neatly and securely.Many people find it easier to grip jump rings with round-nose pliers, but smooth flat-nose and chain-nose pliers make it easier to grip your jump ring without leaving tiny dents. For best control, try using a pair of chain-nose pliers in one hand, and a pair of bent flat-nose pliers in the other hand.
…
Oct 27th 2021
Interchangeable Constellation Bangle Bracelet Tutorial
Create sparkling constellation jewelry in an hour, using minimal supplies and Swarovski Ceralun Ceramic Epoxy Clay, Crystal Clay, or your favorite epoxy clay. This quick-change bracelet form allows you to change the focal piece as often as you like. For this project, we have selected two centerpieces.Created by: Sondra BarringtonDesigner TipsBegin by choosing constellations from a preferred book or website, to use as reference.For step-by-step instructions, see our blog article: Constellati
…
Oct 27th 2021
Kraken Belt Buckle Tutorial
Created by: Elisabeth ValenteDesigner TipsConsider taking a jewelry-making class through a local college or art school. The Complete Metalsmith by Tim McCreight and Simple Soldering: A Beginner's Guide to Jewelry Making are excellent references as well.Glue your image pattern to the metal with rubber cement, and cut along the pattern with a jeweler's saw. Use files to perfect the cut out.Follow the instructions that come with your torch. Always work in a well-ventilated area. Have a fire extingu
…
Oct 27th 2021
Pleasant Dream Etched Barrette Tutorial
Created by: Rita Hutchinson Designer TipsCut your metal sheet to desired size and use a file to round the corners and smooth all edges.Clean with Penny Brite® Copper Cleaner and scrubby until water sheets off. Only handle by the edges from this point on.Stamp your design once, cleanly, and lift the stamp straight off. Allow the ink to dry without disturbing further. If needed or desired, touch up the inked design with black or red Sharpie® marker.Etch as directed following instruction
…
Oct 27th 2021
Enameled Yellow Submarine Tutorial
2018 was the 50th Anniversary of the Beatles' Yellow Submarine! Create your own yellow submarine using bright opaque vitreous (glass) enamels on copper sheet. Created by: Polly Nobbs-LaRue Designer TipsMake a few copies of your template. (You'll find many variations on the internet, or draw your own.) Mine is about 2-3/4 x 1-5/8" (70x40mm). Any larger, and it will be too hard to torch fire. Much smaller, and it will be too hard to add the details.Rubber cement a template to 24-gauge
…
Oct 27th 2021


