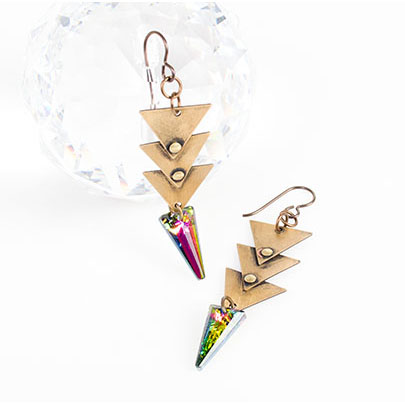
Aztec Princess Earring Tutorial

This project uses Swarovski crystals.
Created by: Tiffany White
Designer Tips
- Mark all six of your triangle blanks with a permanent marker dot in one of the points and straight down on the opposite side.
- Use the hole-punching side of the riveting tool to make a hole in the triangle blanks where you placed your dots.
- Use the riveting tool to rivet the triangles together with the brass rivets.
- Antique the brass pieces with Novacan black.
- Using the sanding sponge remove some of the patina from the brass riveted pieces.
- At the bottom of each earring, attach a Swarovski crystal spike pendant with an antique brass jump ring.
- At the top of each brass piece add two jump rings and a niobium earring wire.
For a step-by-step tutorial with images, check out the Rings & Things blog post:
Futuristic Riveted Earrings with Swarovski Crystal Spikes.
Suggested Supplies
- 1 ounce [use 6] #37-136-6 Antiqued Brass Jump Ring, Round, 5mm
- 1 dozen [use 6] #44-722-03-0 Brass Stamping Blank, Triangle, 17x15mm
- 1 pkg of 50 [use 4] #69-921-02-2 Crafted Findings Brass Rivet, 1/16", 3/32" Long
- 1 pair #34-063-41 Niobium Ear Wire, French Hook
- 1 each #86-310 Novacan Black Patina
- 2 each #06-480-18-06 Swarovski Spike Pendant, 18mm - Vitrail Medium
Tools
- #69-257-0004 3M™ Sanding Sponges, 800-1000 Grit
- #69-907 Crafted Findings 1/16" Long Reach Rivet Piercing/ Setting
- #69-083 Tool, Pliers, 5", Ergonomic, Chain Nose
Jan 1st 2021
Our Bead Blog
-

Simply Springy 2-Hole Bracelet
Apr 28th 2025Designed by: Guest Designer Deb Floros Suggested Supplies 1 #61-840-50-01 Beadalon Cord, WildFire,
-

Exotic Statement Necklace
Apr 28th 2025Designed by: Guest Designer Deb Floros Suggested Supplies 1 #88-400-003-5 58x50mm Pewter Connector,
-

Rubber Tubing Necklace and Memory Wire Bracelet Set
Mar 21st 2025Designed by: Guest Designer Deb Floros Suggested Supplies 1 #61-622-02 2mm Rubber Cord, Bulk, for J