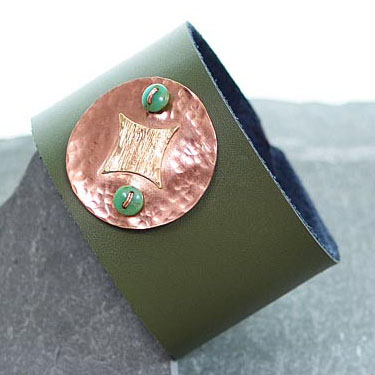
Avocado Dorado Cuff Bracelet Tutorial

Created by: Polly Nobbs-LaRue
Designer Tips
Solder Brass Ninja Star* to Copper Disk:
- If the copper or brass shapes are bent, straighten them with a steel block and nylon or rawhide mallet.
(Solder doesn't fill gaps.) - File/sand/polish to any rough edges or deep scratches.
- Snip 5-10 tiny (1-2mm long) pieces of solder into a small bowl.
- Use a small paintbrush to coat the back of the brass "ninja star", and the front of the copper disk with flux.
(You may need to mix the flux to a more paste-like consistency.) - Place the disk on a magnesia soldering block.
- Place tiny pieces of solder on the disk, where the brass star will be soldered. (If possible, stick them to the flux on the back of the brass star instead.)
Texture as Desired:
Add Beads and Stitch Soldered Disk to Leather Bracelet:
The girls would turn the colour of a juicy avocado
When he would drive down their street in his El Dorado
Pablo Picasso ... (NSFW)
Suggested Supplies
- 1 each [use two 4" pieces] #47-405-26 26-gauge Bare Copper Wire
- 1 pkg of 100 [use 2] #23-036-1302 CzechMates Czech Glass Bead, 2-Hole Lentil, 6x2.6mm - Picasso - Turquoise Color
- 1 dozen [use 1] #44-722-14-0 Blank, Ninja Throwing Star
*The brass "Ninja Star" blank is no longer available ... you can cut your own from 24g sheet, or we linked a few possible alternates above. - 1 each #44-785-23 Blank, Round, 32mm (or cut your own from copper sheet)
- 1 each #51-810-15-39 Bracelet, Genuine Leather, 1-1/2", Cuff
- 1 each #69-386 Magic Flame, 8oz.
- 1 each #86-915 Renaissance® Micro-Crystalline Wax Polish
- 1 troy ounce [use ten 1-2mm pieces] #69-395 Solder, Bronze Wire
Tools
- #82-596 Craft Brush, Metal Handle
- #69-257-0000 Polishing Paper, Assortment, Wetordry™
- #87-081 Rings & Things Blazer® Torch Kit
- #83-101 Sharpie®, Extra Fine Point
- #69-088 Sparex®, 2-1/2lbs
- #69-252-01-2 Tool, Flat File, 6", #2 Cut
- #69-136 Tool, Hammer, Nylon
- #69-357 Tool, Little Dipper™ Pickle Pot
- #69-235 Tool, Metal Punch, Two Hole
- #69-198 Tool, Micro Engraver
- #69-125 Tool, Steel 4" Square Block
- #69-380 Tool, Tapered Flush-Cutter
- #69-427 Tool, Titanium Soldering Pick
- #69-260 Tool, Tweezers, Copper, 9"
- Small pyrex bowl, filled with water for quenching
- Green kitchen scrubbie
- Post-it® or Sticker
- 2 turquoise-colored beads of your choice
- #69-355-08 ShineBrite™, for Tumbler, 8 oz.
- #69-228 Tool, Pliers, Bracelet Bending, Nylon Jaw
- #69-282 Tool, Stainless Shot, 2lb
- #69-281 Tool, Tumbler, 3lb Capacity
- Book, Jewelry Lab: 52 Experiments, Investigations and Explorations in Metal
- Book, Simple Soldering: A Beginner's Guide to Jewelry Making
- Book, Soldering Made Simple: Easy Techniques for the Kitchen-Table Jeweler
Sep 22nd 2021
Our Bead Blog
-

Simply Springy 2-Hole Bracelet
Apr 28th 2025Designed by: Guest Designer Deb Floros Suggested Supplies 1 #61-840-50-01 Beadalon Cord, WildFire,
-

Exotic Statement Necklace
Apr 28th 2025Designed by: Guest Designer Deb Floros Suggested Supplies 1 #88-400-003-5 58x50mm Pewter Connector,
-

Rubber Tubing Necklace and Memory Wire Bracelet Set
Mar 21st 2025Designed by: Guest Designer Deb Floros Suggested Supplies 1 #61-622-02 2mm Rubber Cord, Bulk, for J