Rings & Things Jewelry Blog
Sundance Bolo Tie Necklace Tutorial
Created by: Mollie ValenteDesigner TipsFor step-by-step illustrated instructions to make the Sundance Bolo Tie Necklace, see our blog post: How to Make a Silk Ribbon and Cameo Bolo Tie NecklaceHelpful tips for secure, professional glue bonds: Gluing Metal Findings 101.Suggested Supplies1 each #27-960-24-901 Cameo, Horse, 18x25mm 1 each #61-479-36 Hand Dyed Silk Ribbon, 32-36", Soft Rock Blend 1 dozen (use 1 piece) #36-714-1 Bolo Slide Blank, 16mm Disk - White Plated 1 strand (use 2 beads) #26-81
…
Feb 22nd 2023
Buried Treasure Acorn Earrings Tutorial
Created by: Mollie ValenteDesigner TipsString the 4.5mm round corrugated bead onto the head pin.String two rubber earring backs onto the head pin, the first one positioned against the 4.5mm round corrugated bead with the second one positioned about 11mm apart. The earring backs serve as bead adjusters for the large-hole mirage bead.String the Mirage bead onto the head pin and slide it over the rubber earring backs. The earring backs should be hidden just inside the Mirage bead (adjust their posi
…
Feb 22nd 2023
Little Sprout Necklace Tutorial
Created by: Mollie ValenteDesigner TipsFor step-by-step illustrated instructions showing how to engrave the pendant, see Rings & Things blog post "Jewelry Making DIY – Make a Micro Engraved Pendant"Next, assemble the necklace:New to jewelry-making? See Basic Jewelry-Making Technique Sheet (PDF) for most secure method of opening and closing jump rings, and other basic jewelry-making information.Attach a 6mm jump ring to the completed pendant's hanging hole.Cut the ball chain to your desired l
…
Feb 22nd 2023
Drops of Sunshine Earrings Tutorial
Created by: Rings & Things StaffDesigner TipsStack one aquamarine bead, one twisted spacer and one citrine onto each eye pin, and make a wire-wrapped looop to close at each end, making sure to attach starfish charm to the aquamarine ends before finishing.New to jewelry-making? See Basic Jewelry-Making Technique Sheet (PDF) for step-by-step instructions on making wire-wrapped loops.Attach other end loops to ear wires.Suggested Supplies1 strand (use 2 beads) #21-886-615 Matte Aquamarine 6mm Ro
…
Feb 22nd 2023
Happy Hour Wine Glass Markers Tutorial
Created by: Janet BoyingtonDesigner TipsCreate stamped charms using Monogram stamp set. New to stamping? See Metal Stamping 101 for an overview, or download our step-by-step PDF stamping guide.Use Stamp Enamel to make the design pop, and wipe off excess with a paper towel or soft cloth (follow usage instructions on Stamp Enamel package).Use the crystal setter kit to stamp an indent for a crystal rhinestone. It should be deep enough to protect the edges of the stone, but the top of the crystal sh
…
Feb 22nd 2023
Beachcomber Wine Glass Charm Set Tutorial
Created by: Veronica GreenwoodDesigner TipsCreate a colorful beaded drop for each wine glass marker, using gemstones or other beads of your choice. New to jewelry-making? See Basic Jewelry-Making Technique Sheet (PDF) for how to make wrapped loops using eye pins.Add an oval jump ring to each charm so they face the proper direction (twist sideways to open and securely close each jump ring).Add approximately 10 seed beads to each hoop, then a charm and beaded drop, then 10 more seed beads.Use chai
…
Feb 22nd 2023
The North Star Necklace Tutorial
Created by: Mollie ValenteDesigner TipsCreate a bail using a 5/16" x 3" piece of 24-gauge copper sheet: Cut, file, stamp, punch and ream the holes a bit larger. Use bail-making pliers to bend the stamped piece into a bail (dead center so the holes line up). Patina after bending.Stamp the brass star charm: See Techniques for Creating Stamped Metal Charms.Create gemstone donut chainmaille: Add four 10mm jump rings to each donut. Connect two per side with 8mm jump rings. Use 8mm jump rings on the e
…
Feb 22nd 2023
Well Suited Barrette Tutorial
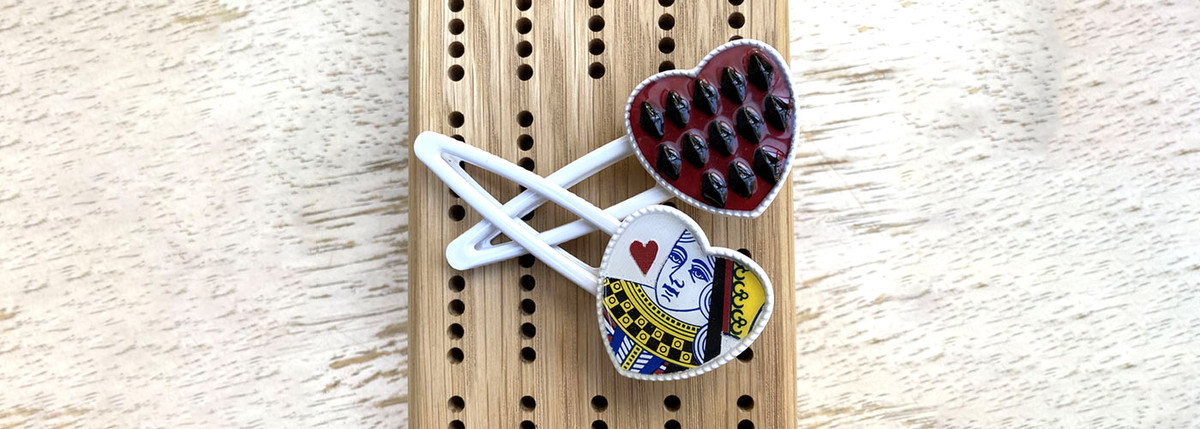
Created by: Megan Holden Designer TipsClean bezels of barrettes with a clean, wet cloth and allow to dry.Paint the bottom of one barrette bezel with red paint, using smallest brush of Ranger set to ensure clean lines at the perimeter. Allow to dry and repeat with 2nd coat, dry thoroughly.Press small piece of paper around the perimeter of the bezel interior to make an impression for cutting a heart template. Cut heart template with scissors around crease lines (most likely will be a tad la
…
Feb 22nd 2023
Scrap Chain Tassel Earring Tutorial
Created by: Amy Mickelson Designer TipsIf you buy spools of chain for various projects, you inevitably end up with scrap pieces. These left overs are too short for necklaces or maybe too fine a style to use for bracelet projects. And if you're like me, you may have a bag of random lengths you don't want to throw away. This DIY project creates a pair of tassel style earrings in less than 30 minutes.Since you are using scraps, and mixed metal jewelry remains in fashion, you don't need to ma
…
Feb 22nd 2023
Soar With Me Cuff Bracelet Tutorial
Created by: Valorie Nygaard-PouzarDesigner TipsPatina, seal and use bracelet-bending pliers to apply a gentle curve to the metal sparrow before riveting it to the leather.For hints on applying Vintaj patina, see blog post: Customizing Tim Holtz idea-ology® Word Bands for a Handmade Look.To prevent the rivet from slipping through the leather, add washers or rivet accents to the backside of the leather. Rivet accents are ready-to-use with no need to measure or cut the perfect hole size, but they a
…
Feb 22nd 2023


