Rings & Things Jewelry Blog
Mala Prayer Necklace Tutorial
Created by: Mollie ValenteDesigner TipsFor step-by-step instructions (with photos!) to make this necklace, see our illustrated blog article: Make a Tassel Necklace with Prayer BeadsSuggested Supplies1 spool (use 42") #61-710-007 Super-Lon Bead Cord1 pack (use 111 beads) #20-225-221 Size 8 TOHO Seed Beads1 strand (use 100 beads) #29-580-08 Rosewood Mala Beads1 pack (use 1 bead) #26-816-205 Brushed-Finish Gold Bead1 each #49-958-52-AG TierraC
…
Sep 30th 2021
Sunrise Succulents Earrings Tutorial
Created by: Veronica Greenwood Designer TipsChoose the size of chaton to fit into the center of your succulent charm. Using the GS Hypo Cement add a little glue in the center of your charm and place your chaton. Set aside to dry.Cut 6" of wire, make a loop on one end and attach it to the loop on your post. Finish wrapping and cut the extra wire off. For step-by-step wire wrapped loop instructions, see Jewelry Basics 101 (PDF).Add three bamboo coral beads, one strawberry q
…
Sep 30th 2021
Sunrise Centerline Bracelet Tutorial
No fancy beading techniques or knots required -- If you can string beads with a needle and thread, you can create lovely designs with these bracelets!Created by: Veronica GreenwoodDesigner TipsStretch and wax 1 yard of Beige 1-G thread, or use .006" Fireline. Follow instructions in this video, or the PDFs below, to add Delicas in desired pattern to the bracelet.For a closer look at the colors in this bracelet pattern, see alternate image here.Suggested SuppliesYou'll have plenty of left-over bea
…
Sep 30th 2021
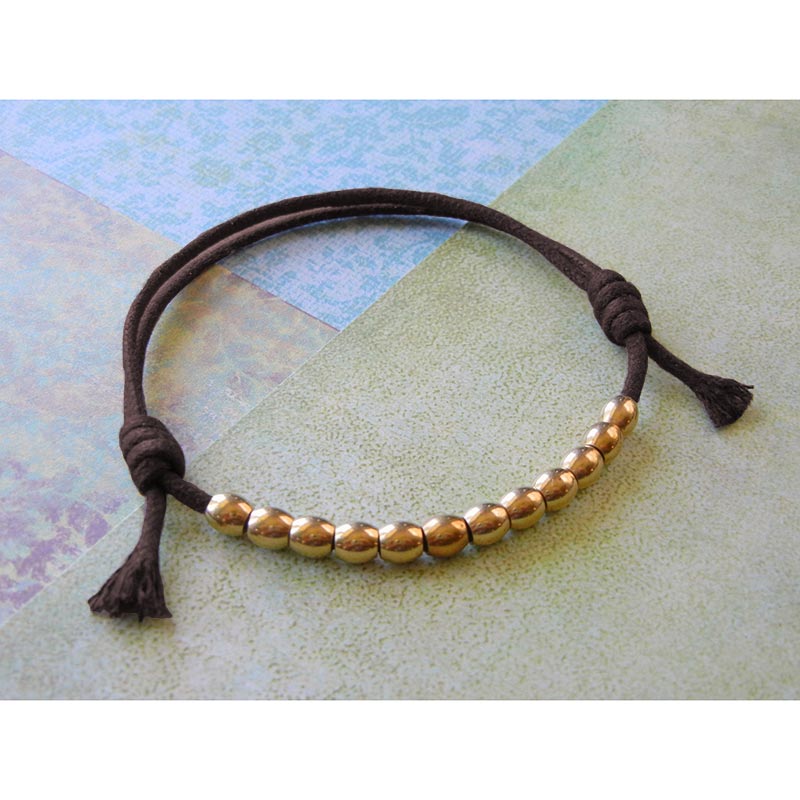
Sliding Knot Bracelet Tutorial
Created by: Mollie ValenteDesigner TipsTying a sliding knot may sound tricky, but with a little practice it's not. Rather than trying to recreate the instructions here with just words, please see our step-by-step illustrated blog article @ blog.rings-things.com/2019/08/jewelry-making-diy-sliding-knot-necklace-cordSuggested Supplies1mm or 2mm Leather or Waxed Cotton Cord, such as #61-542Large-Hole beads, such as #26-114ToolsScissors
…
Sep 30th 2021
Safe Journey Pendant Tutorial
Created by: Mollie Valente Designer TipsTo add texture, place the metal blank on the steel block and use the ball end of the hammer to make a lightly hammered surface.After hammering, the metal blank will be work-hardened and will require annealing. Place the blank on a fire block and use a micro torch to anneal the piece. Cool to room temperature. Bonus: annealing also serves to heat patina the piece of metal.To bend the bail, place the metal blank in the jaw of the bail-making pliers, c
…
Sep 30th 2021
Off the Map Cuff Links Tutorial
Created by: Mollie Valente Designer TipsSeal the front and back of the images with Crafter's Pick™ The Ultimate adhesive or Mod Podge® to prevent the images from bleeding.To prevent the images from floating, glue them to the bottom of the bezel cups. Allow the glue to dry thoroughly prior to adding resin.Create a level surface for the resin to cure in the cuff links: Turn a cardboard box over and poke holes in the lid with a pen or other sharp object.Follow instructions in the Epox
…
Sep 30th 2021
Craft Beer Can Belt Buckle Tutorial
Upcycle a craft beer can, or any aluminum can with awesome graphics, into a custom belt buckle. Great gift for a craft beer aficionado!Created by: Mollie ValenteDesigner TipsParts are listed below.For the illustrated step-by-step tutorial, including great tips on making a template and preparing your work surface, please see Mollie's full article at blog.rings-things.com:DIY - Make a Belt Buckle from a Craft Beer Can.Suggested Supplies1 each #30-682-01-AS Antiqued Silver Plated Belt Buckle Blank,
…
Sep 30th 2021
Noble Fir Necklace Tutorial
Created by: Mollie ValenteDesigner TipsCreate a COPPRclay™ pendant following the manufacturer's guidelines included with the clay and your kiln.Mollie made her own pattern sheet by taking a piece of textured wallpaper and punching a branch design in it.Pre-roll your clay to 8-card thickness, and then lay the paper beneath and roll again to 6 card thickness.Remove paper, and cut to the desired shape (Mollie cut an oval), then create a hole for hanging the pendant.Allow the piece to fully dry, and
…
Sep 30th 2021
M is for Monogram Necklace Tutorial
Created by: Mollie ValenteDesigner TipsFabricate the BRONZclay focal according to the manufacturer's instructions. Like many other metal clays, BRONZclay must be fired in a kiln. BRONZclay shrinks approximately 20% from package to finished product. When you create your pieces, keep this in mind.If you also work with Art Clay™ Silver (ACS), your ACS tools and work surfaces must be kept separate from the tools and surfaces that you use with BRONZclay. The materials do not work well together, and y
…
Sep 30th 2021
Tethered - Lanyard Tutorial
The key to making masculine jewelry is using masculine supplies and keeping it simple. Combine strong leather or waxed cotton cord with bone beads, metal beads, or glass trade beads and then add a bold focal pendant. It is also a benefit if the jewelry has a utilitarian purpose.Here is my version of "men’s jewelry" -- an adjustable lanyard necklace made with guy supplies; it can be used to hold a decorative pendant or be more utilitarian as a key holder. Created by: Mollie ValenteDesigner TipsFo
…
Sep 30th 2021


